Mailchimp List Subscribe Form
Add a Mailchimp signup form block, widget, or shortcode to your WordPress site.
Plugin info
Maintenance & Compatibility
Maintenance score
Stale • Last updated 233 days ago • Support resolved 0% • 77 reviews
Is Mailchimp List Subscribe Form abandoned?
Likely maintained (last update 233 days ago).
Compatibility
Similar & Alternatives
Explore plugins with similar tags, and compare key metrics like downloads, ratings, updates, support, and WP/PHP compatibility.
Description
Use the Mailchimp List Subscribe plugin to quickly add a Mailchimp signup form block, widget, or shortcode to your WordPress site.
After installation, if you already have a Mailchimp account, you’ll log in with that account and then proceed to configure settings.
If you don’t have an account, you can create one directly in the plugin. After entering in all your personal details, you’ll need to activate your account via an email that will be sent to you. Once done, you’ll proceed to configure settings.
On the settings screen, you’ll select your Mailchimp list, choose merge fields and groups, and configure other options. Once done, you can now add the block, widget, or shortcode ([mailchimpsf_form]) to your site. Typically, installation and setup will take about 5-10 minutes, and absolutely everything can be done via the WordPress Setting GUI, with no file editing at all.
WordPress.com compatibility is limited to Business tier users only. How to add a signup form if you have a WordPress.com site.
Access Token Encryption
Starting in version 1.6.0, authentication has changed to use OAuth. As part of this process, we retrieve an access token that can be used to make API requests. To provide a high-level of security, this access token is encrypted before being stored in the WordPress database. In order to ensure this access token can be decrypted when used, the plugin relies on certain security constants that should remain unchanged.
With no additional configuration, we use the standard LOGGED_IN_KEY and LOGGED_IN_SALT constants that are normally set in your site’s wp-config.php file. Some sites make use of security plugins that rotate these constants on a periodic basis. When this happens, we won’t be able to decrypt the access token and you’ll need to reconnect your Mailchimp account to generate a new access token.
To prevent such issues, it is recommended to define two additional constants in your site’s wp-config.php file: MAILCHIMP_SF_ENCRYPTION_KEY and MAILCHIMP_SF_ENCRYPTION_SALT. These constants should consist of a combination of characters, preferably at least 32 characters long. Once set, these values should not be changed. For strong values, you can copy some of the values from here and use them. You’ll end up with additional code like the following in your wp-config.php file:
define( 'MAILCHIMP_SF_ENCRYPTION_KEY', 'put your unique phrase here' );
define( 'MAILCHIMP_SF_ENCRYPTION_SALT', 'put your unique phrase here' );
If these constants are added after you’ve already authenticated with Mailchimp, you will need to reconnect your account. To avoid this, you can copy the values from LOGGED_IN_KEY and LOGGED_IN_SALT (if they exist) to MAILCHIMP_SF_ENCRYPTION_KEY and MAILCHIMP_SF_ENCRYPTION_SALT respectively.
Upgrading
If you are upgrading to version 1.2.1 and you used the widget in your sidebar previously, all you need to do is drag the Mailchimp Widget back into the sidebar, visit the Mailchimp settings page (which will have maintained your prior settings), click the “Update List” button, and you’re done!
Installation
This section describes how to install the plugin and get started using it.
Version 2.8+
- Unzip our archive and upload the entire mailchimp directory to your
/wp-content/plugins/ directory. - Activate the plugin through the Plugins menu in WordPress.
- Navigate to the Mailchimp menu.
- Click the Log in button and proceed through the OAuth flow, logging in to your Mailchimp account and authorizing the application.
- Select the list where you want to send new Mailchimp subscribers.
- Optional: Turn Merge Fields and Groups on or off. Navigate to Appearance, and click Widgets. Drag the Mailchimp Widget into one of your Widget Areas.
- Optional: turn on user synchronization to sync WordPress users to Mailchimp.
Frequently Asked Questions
You need to ensure that the fields are enabled both in your Mailchimp account (Audience > Signup forms) and in the settings of this plugin. Once the fields are enabled in both places, then they’ll appear in the editor and frontend of your site.
Internationalization (i18n) is available on GlotPress at https://translate.wordpress.org/projects/wp-plugins/mailchimp/. Any assistance translating the plugin is greatly appreciated!
Review feed
Screenshots

Mailchimp List Subscribe Form block within the block inserter.
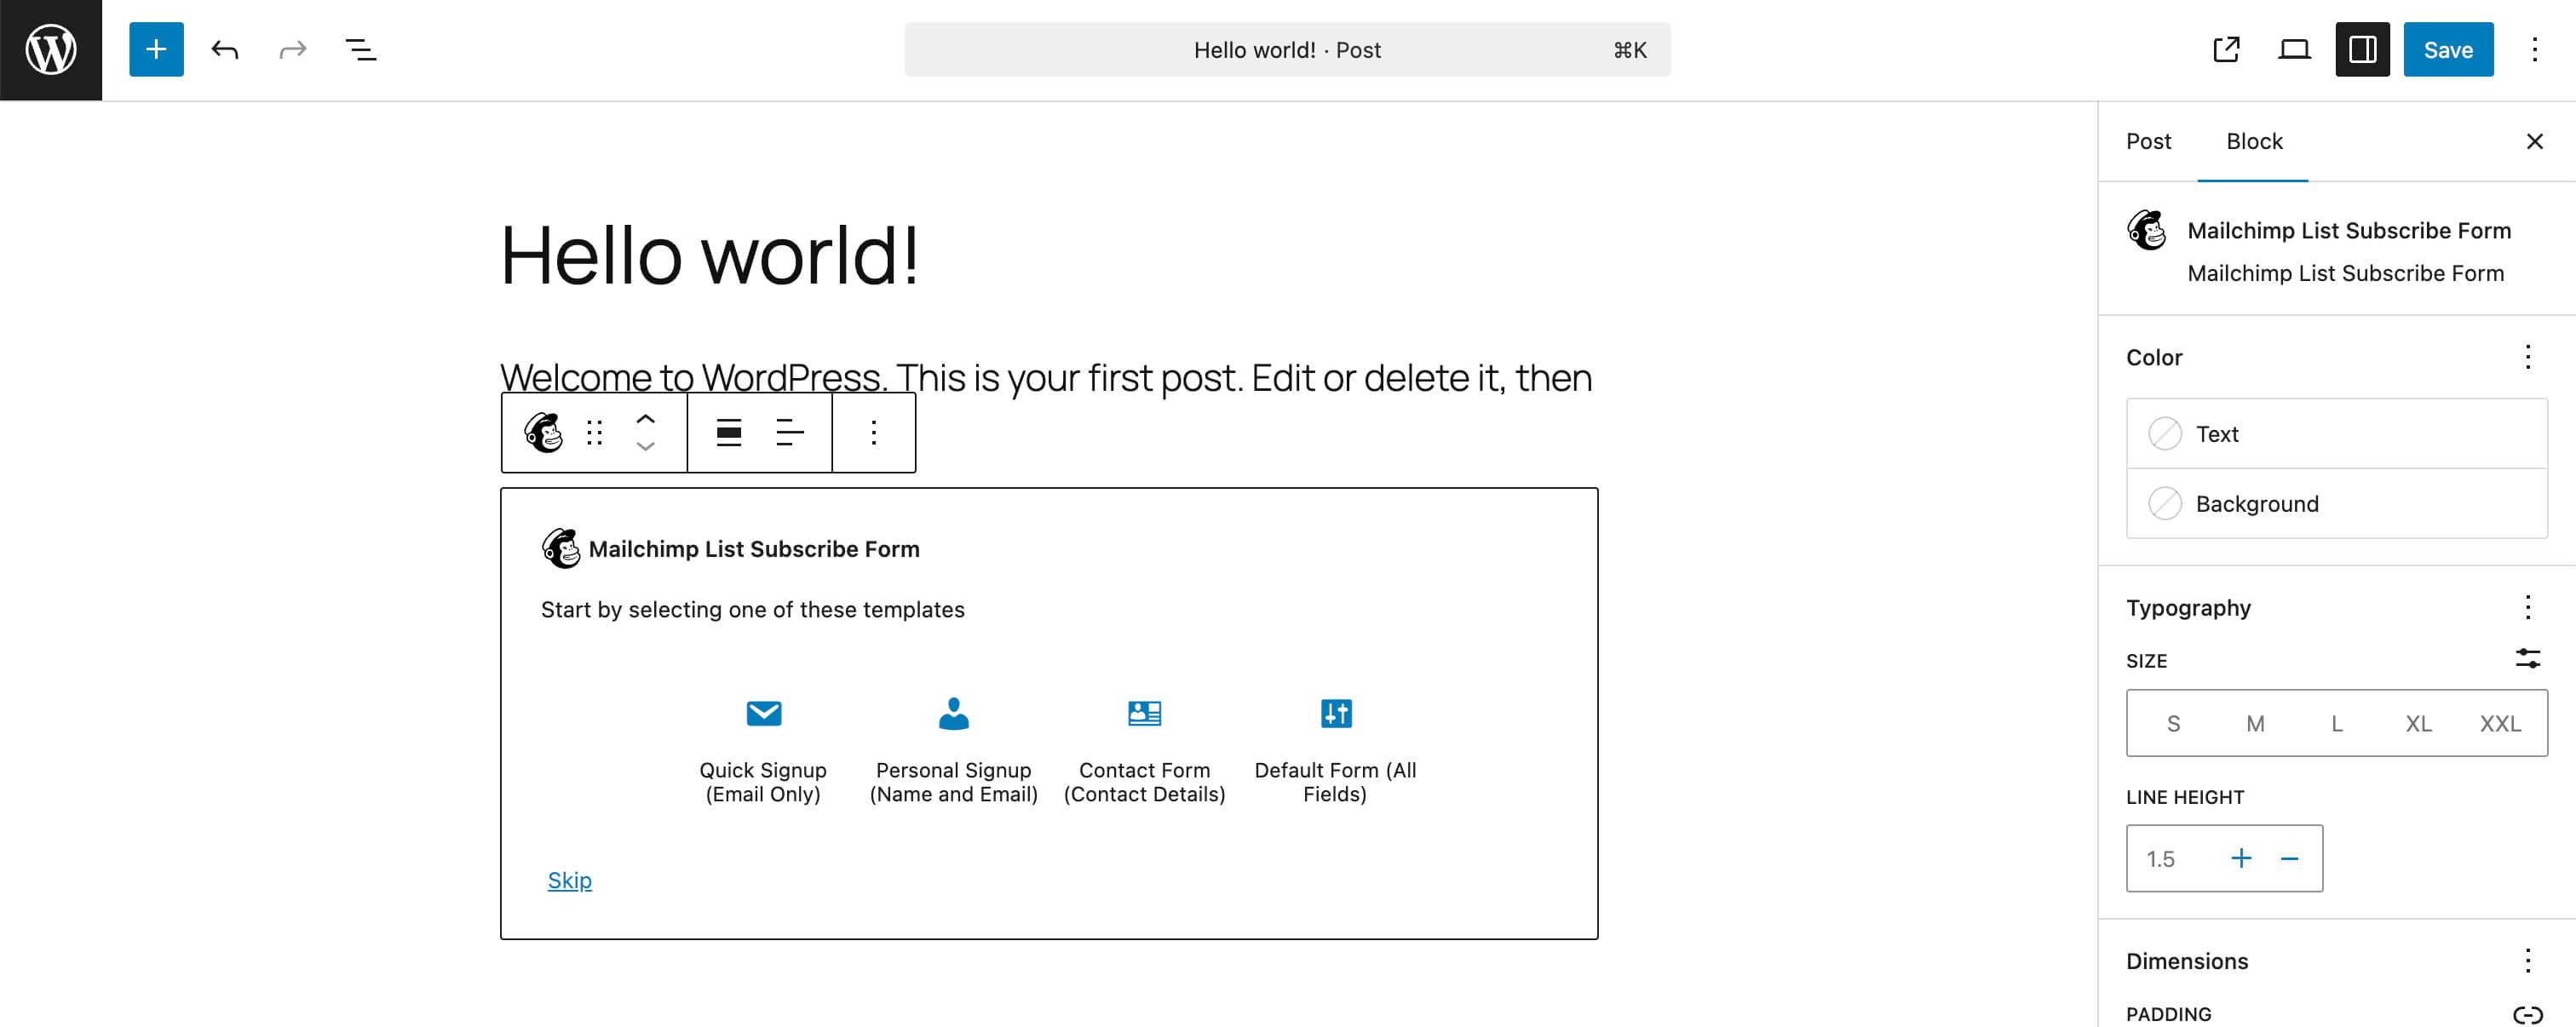
Mailchimp Block default state.
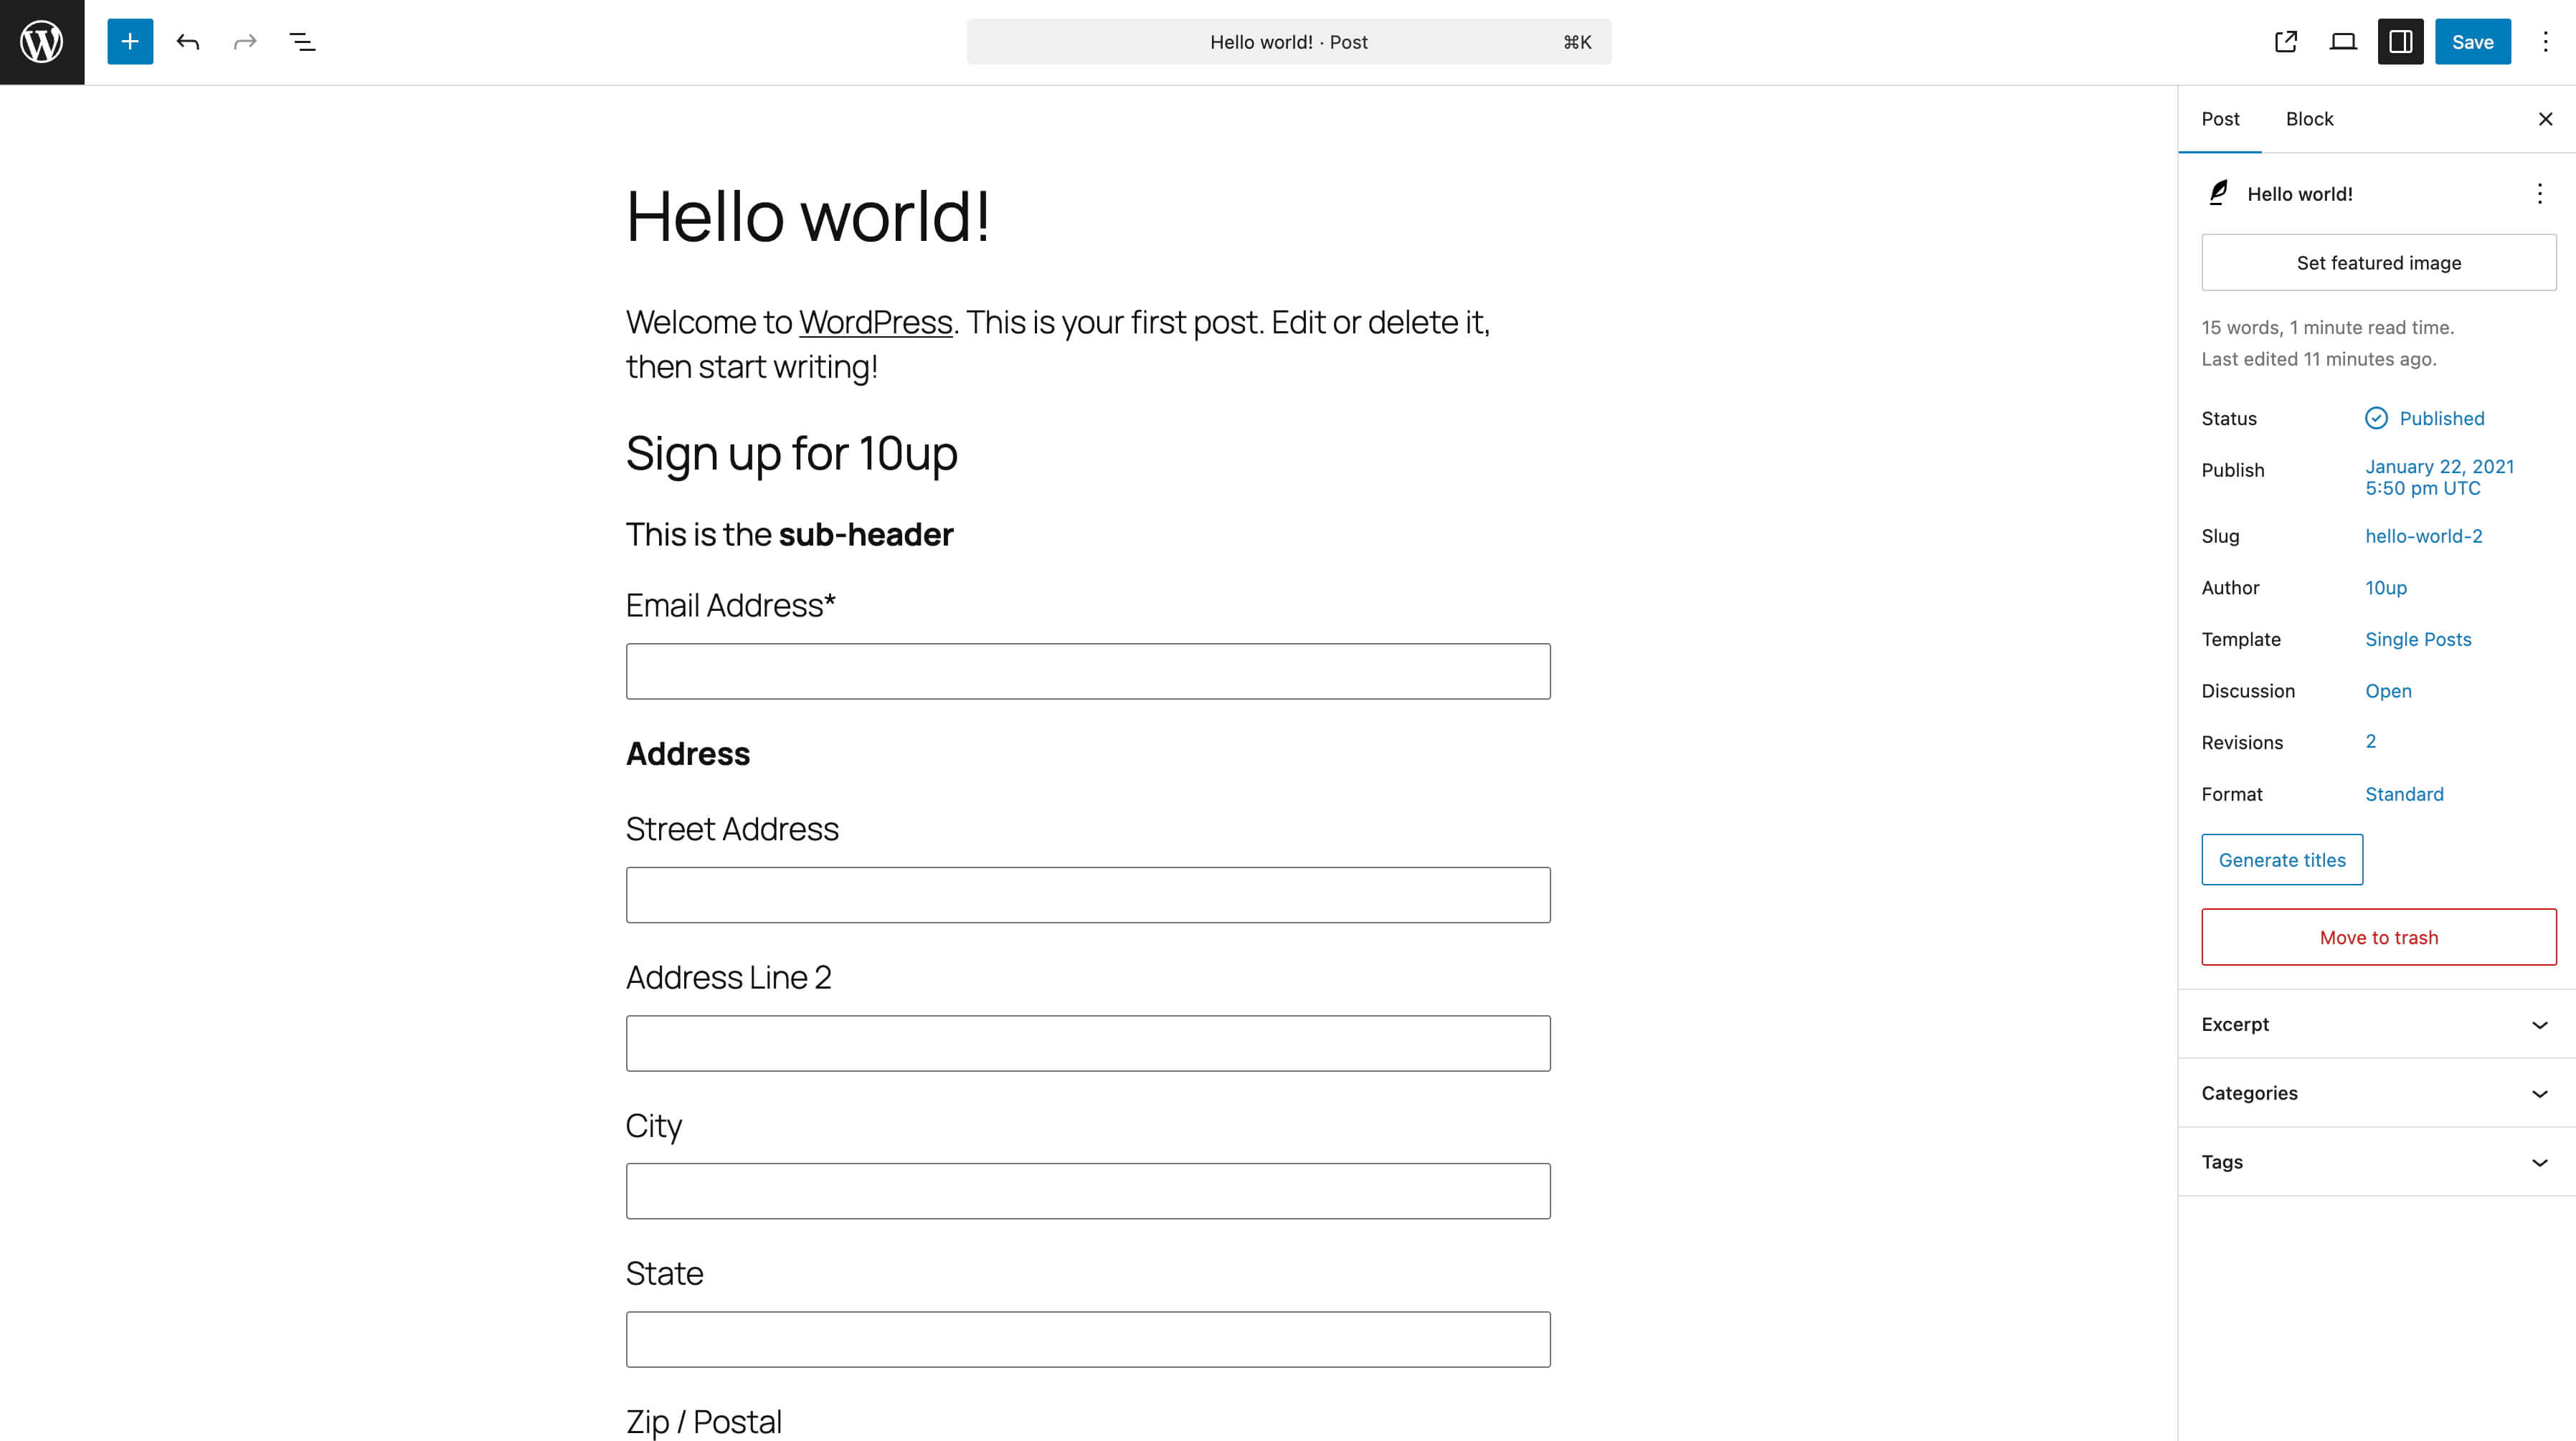
Mailchimp List Subscribe Form block previewing sign up form headers, fields, and button.
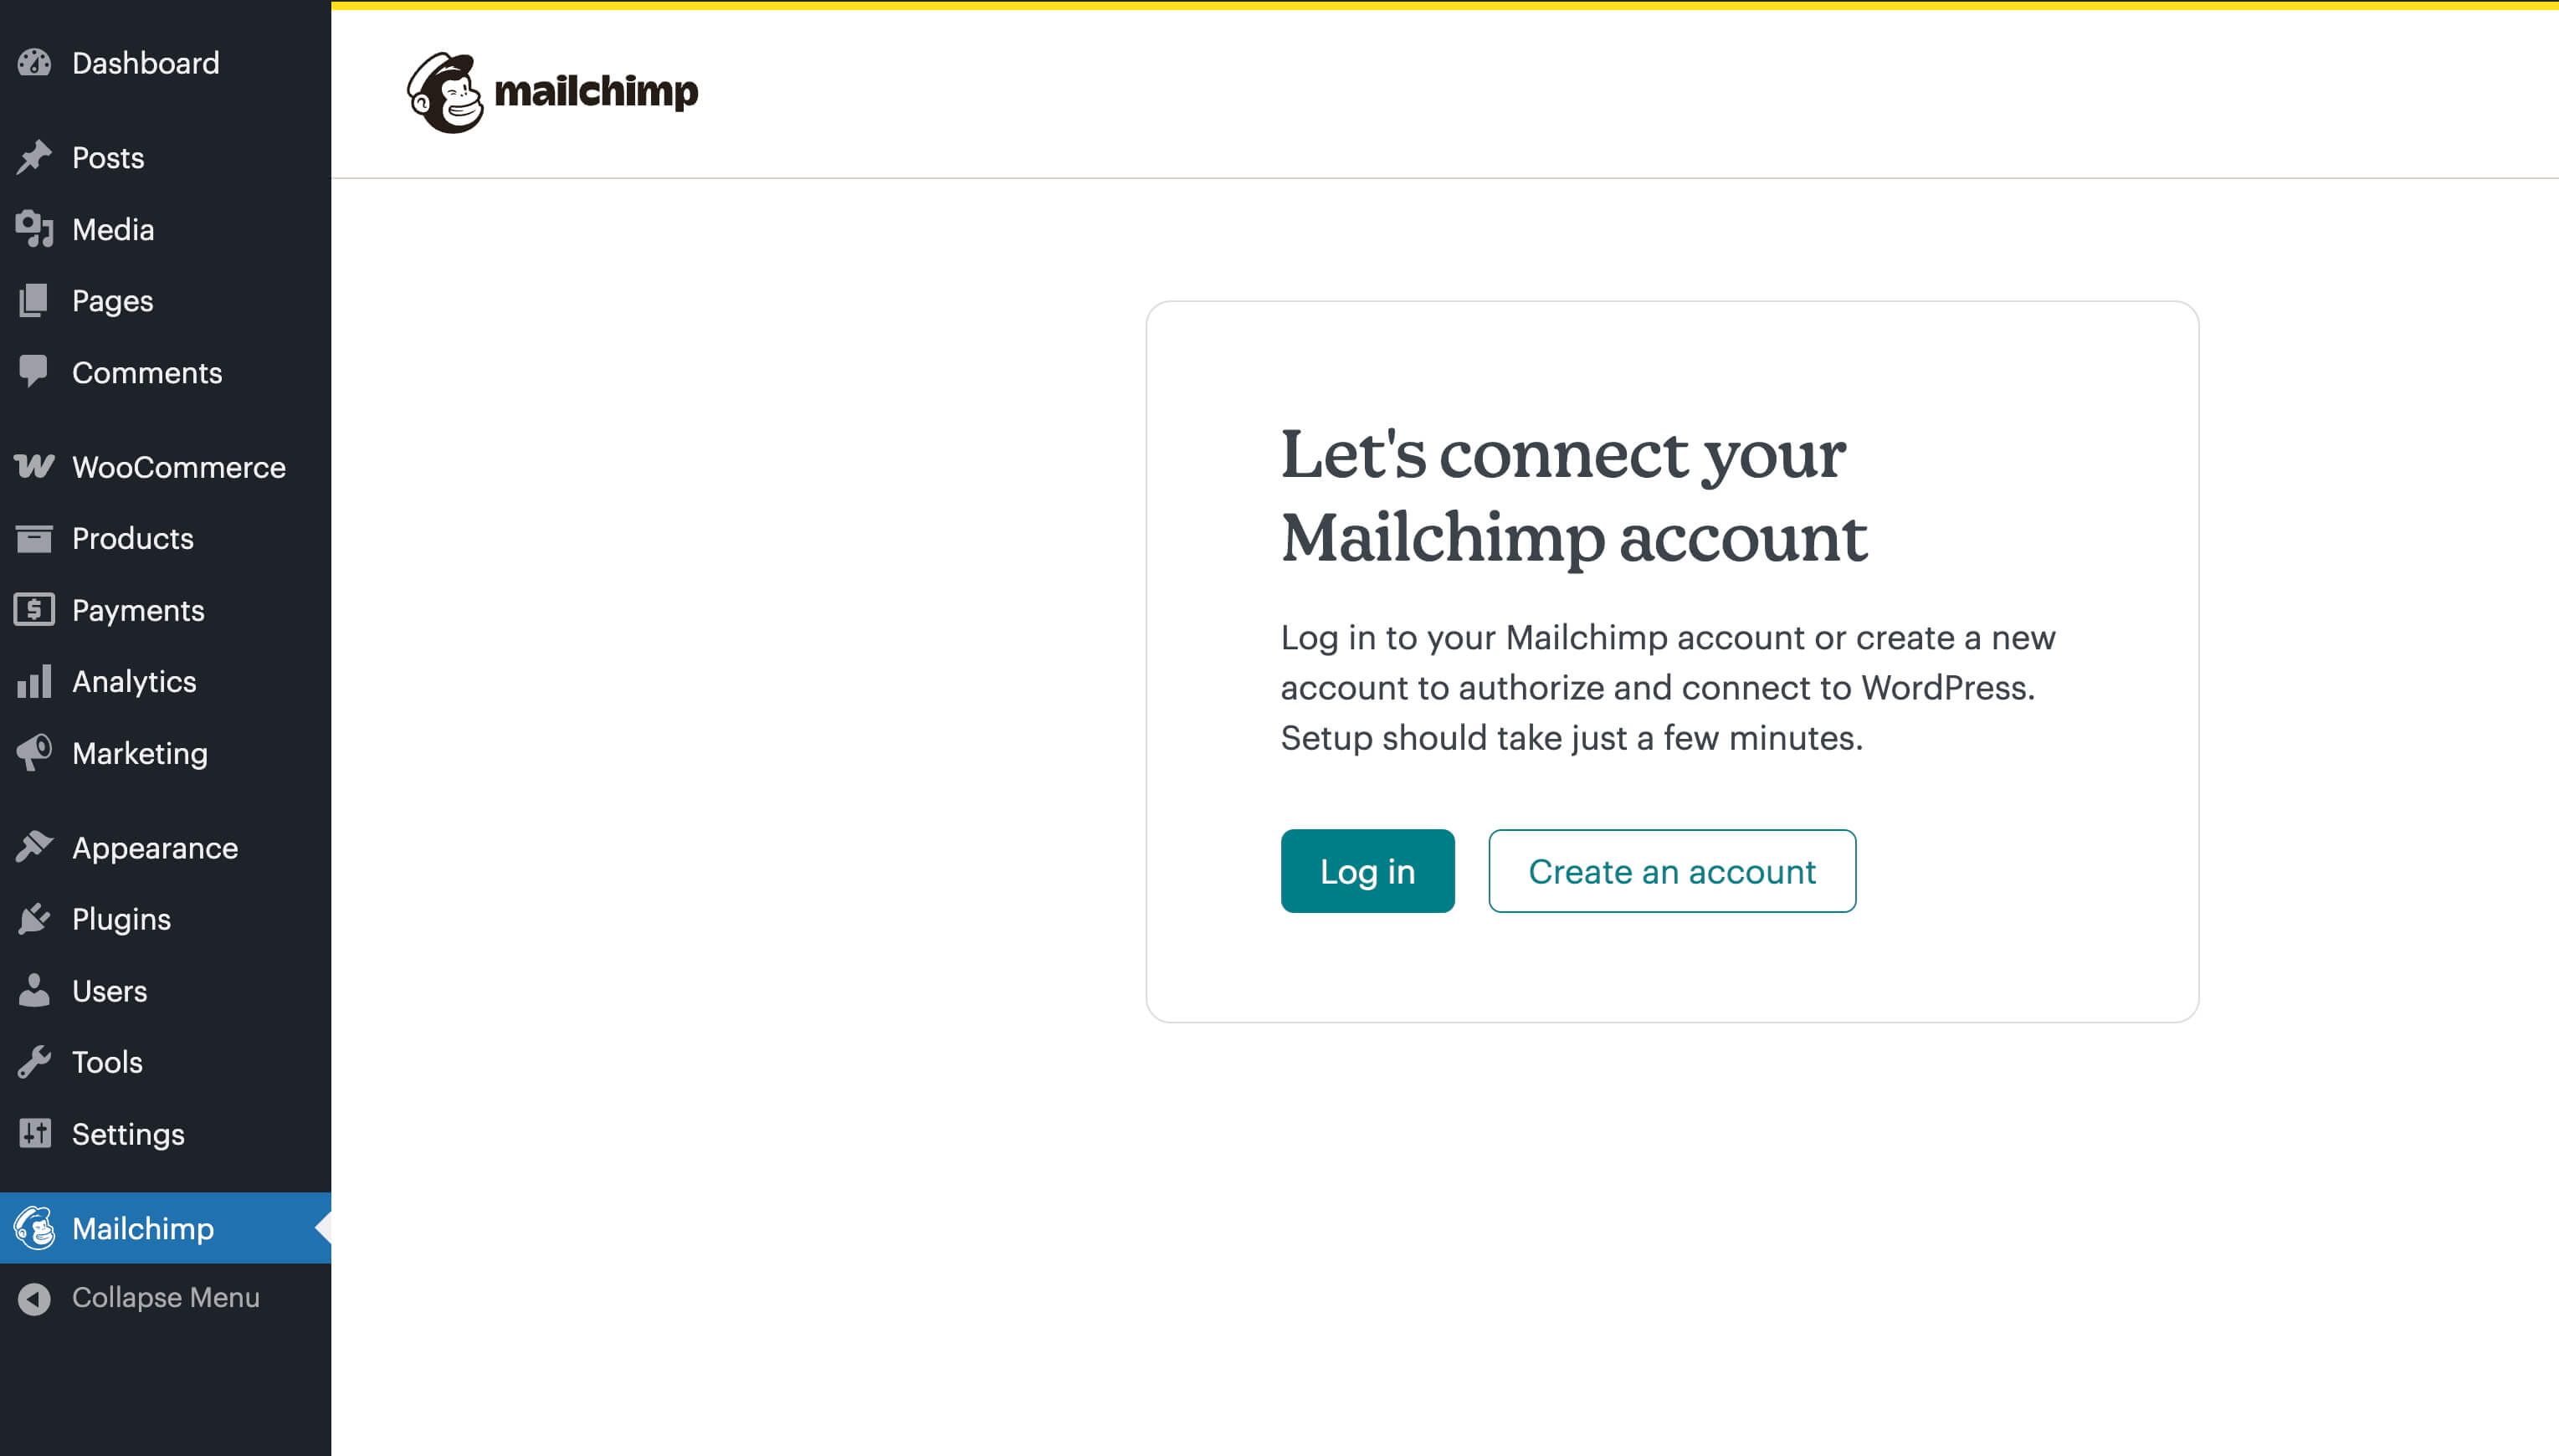
Connecting your Mailchimp account to WordPress via OAuth.
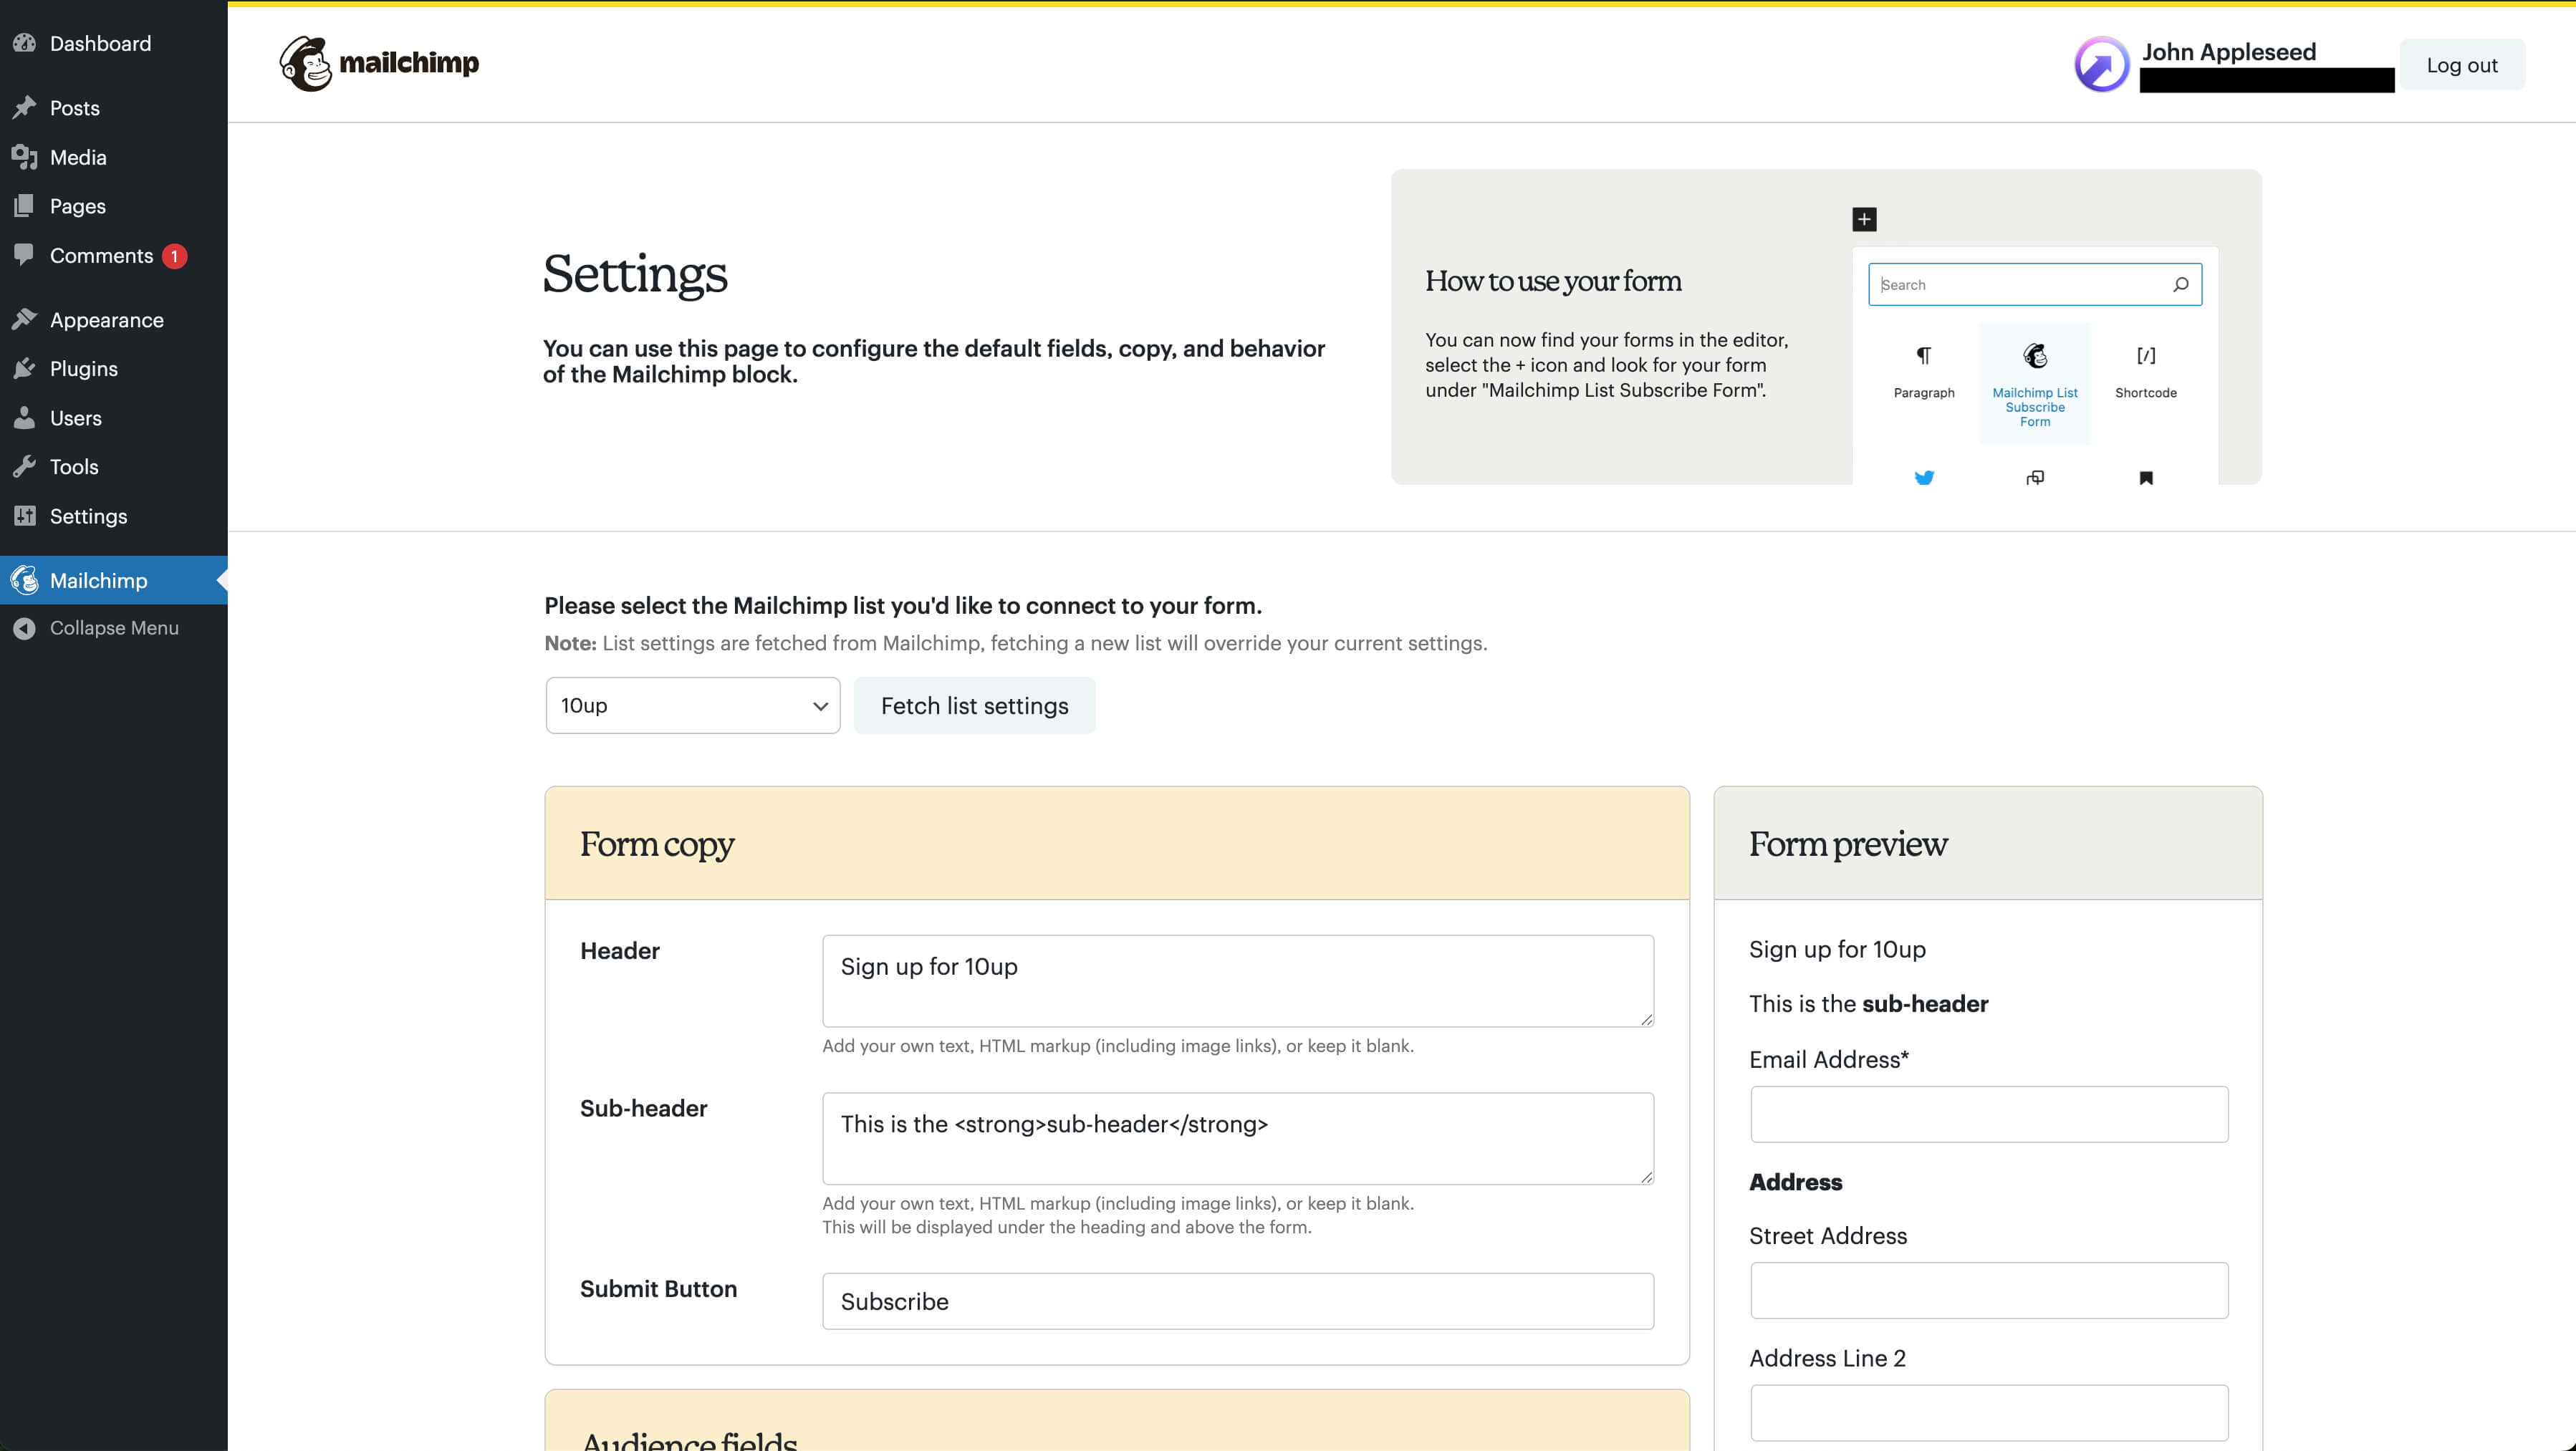
Logged in to your Mailchimp account and selecting a list to connect to.
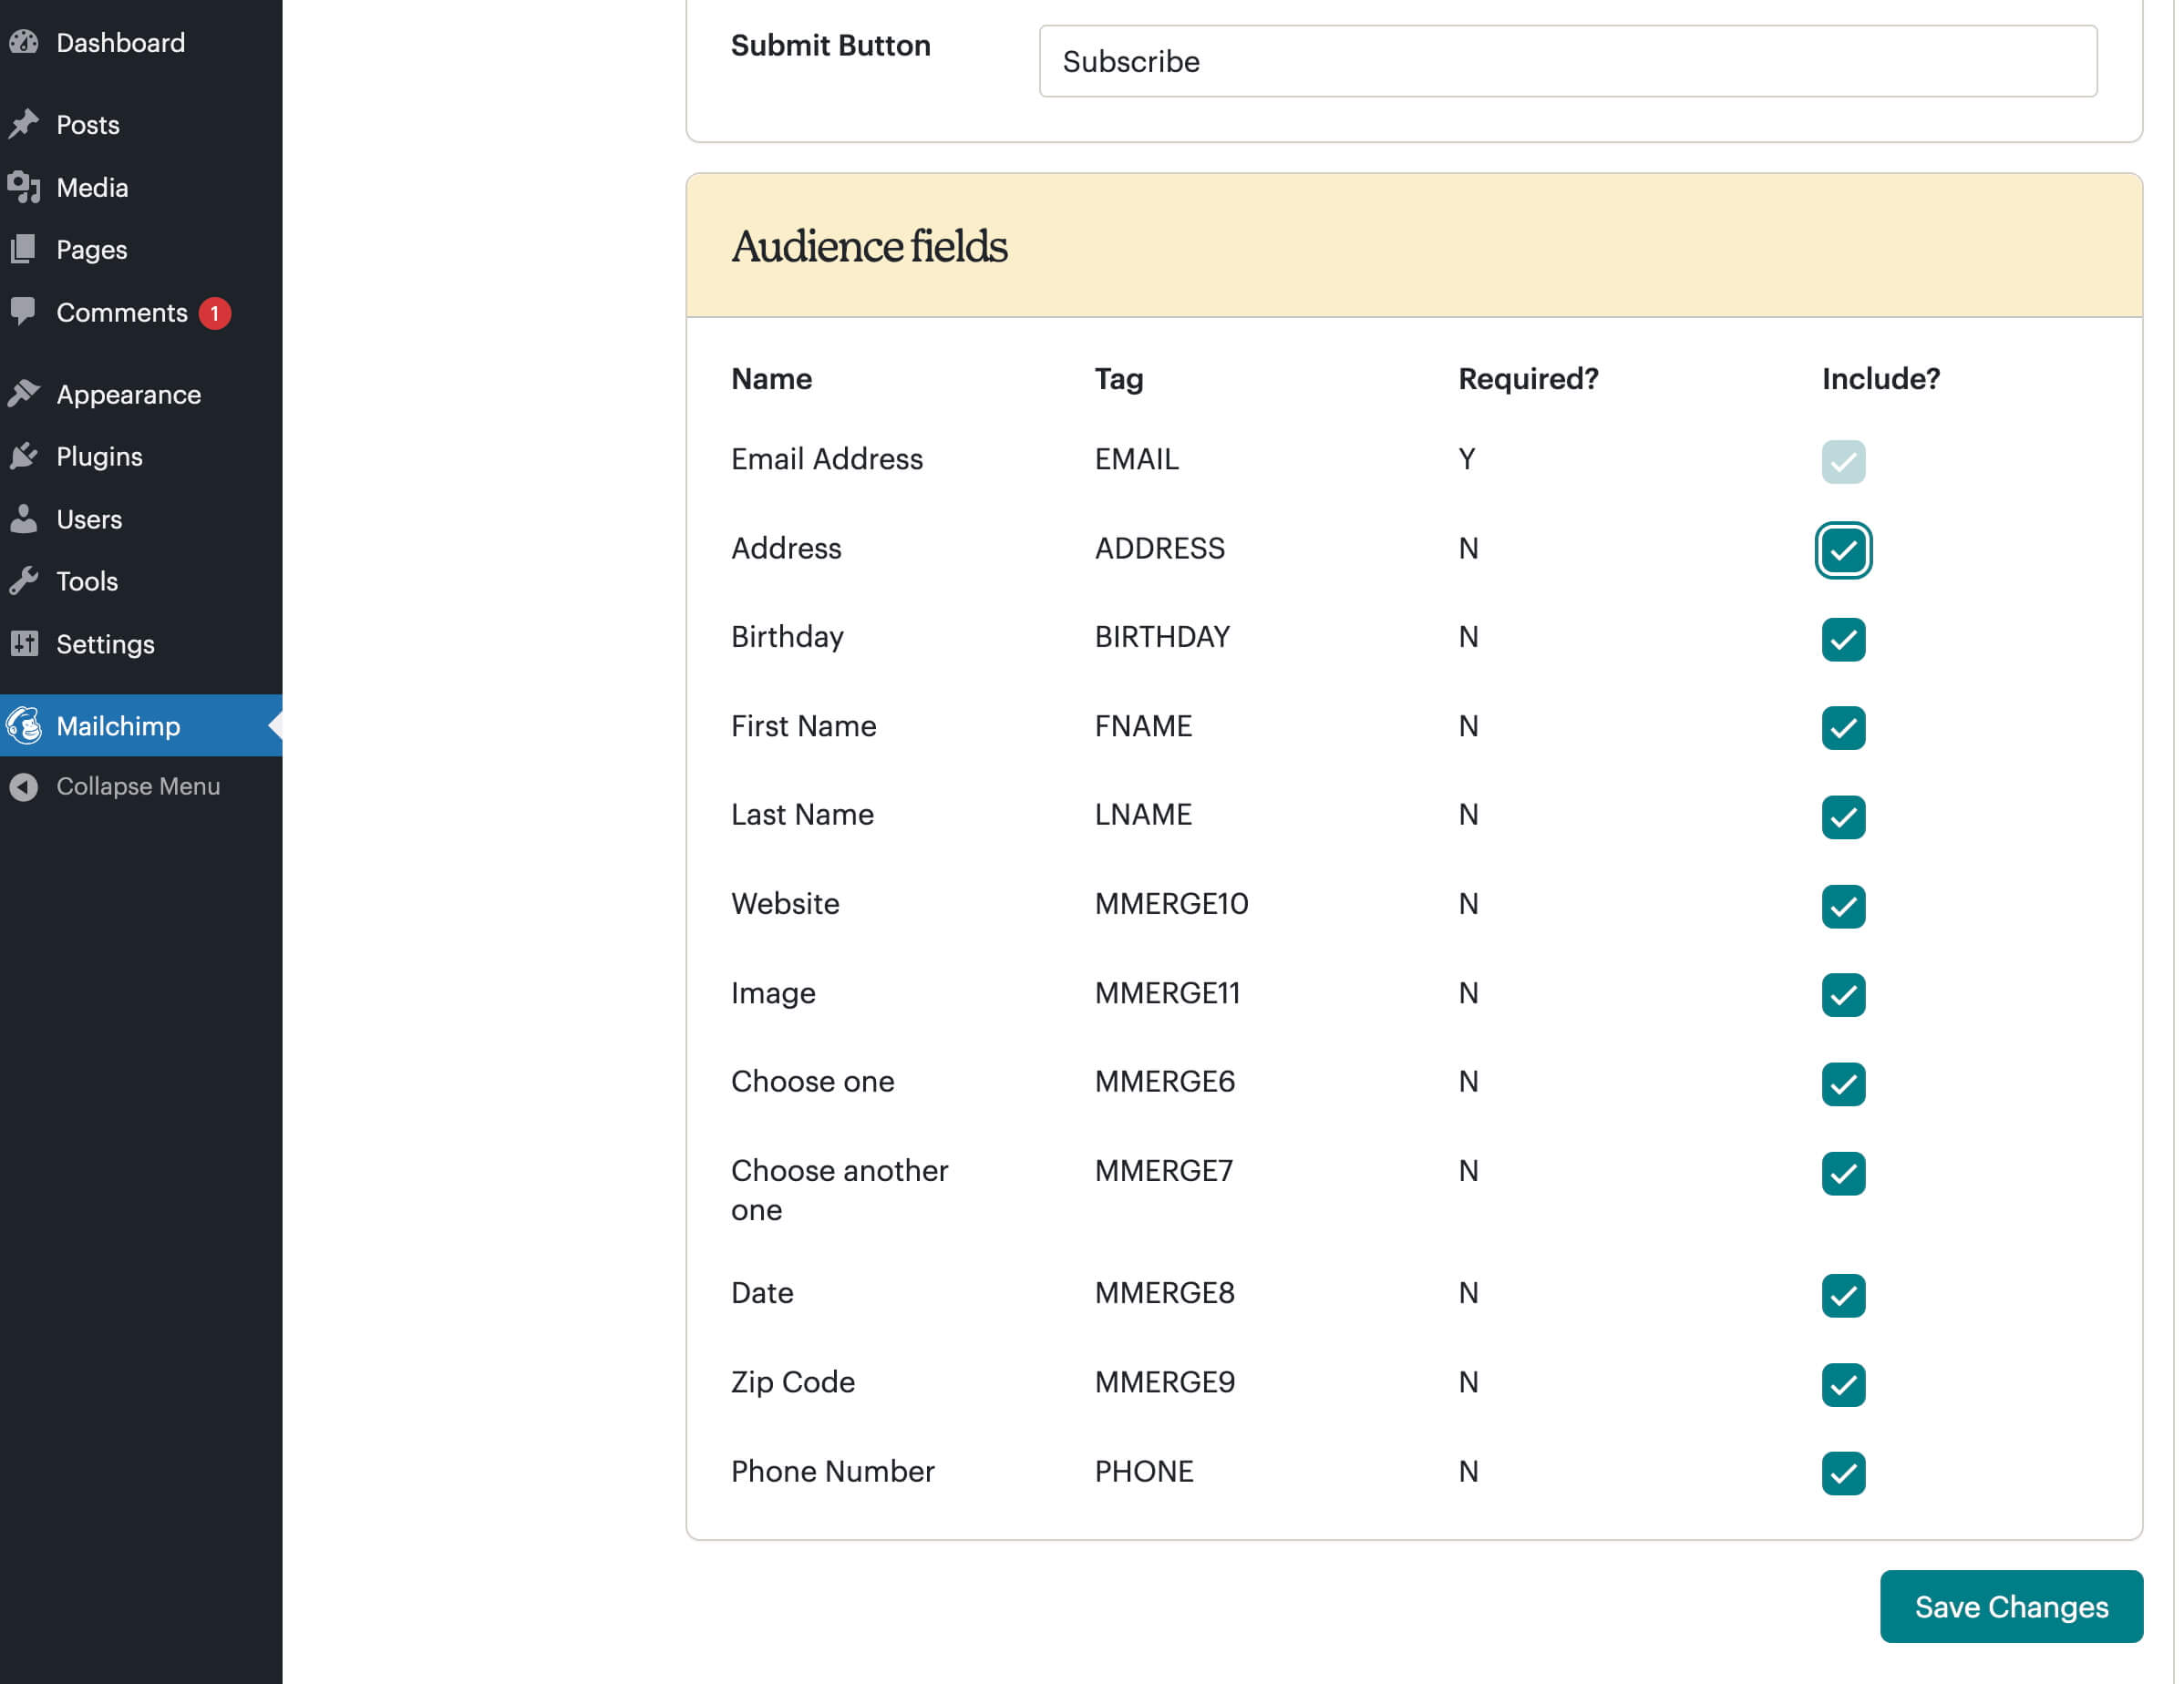
Configuring extra fields on your Signup Form (optional).
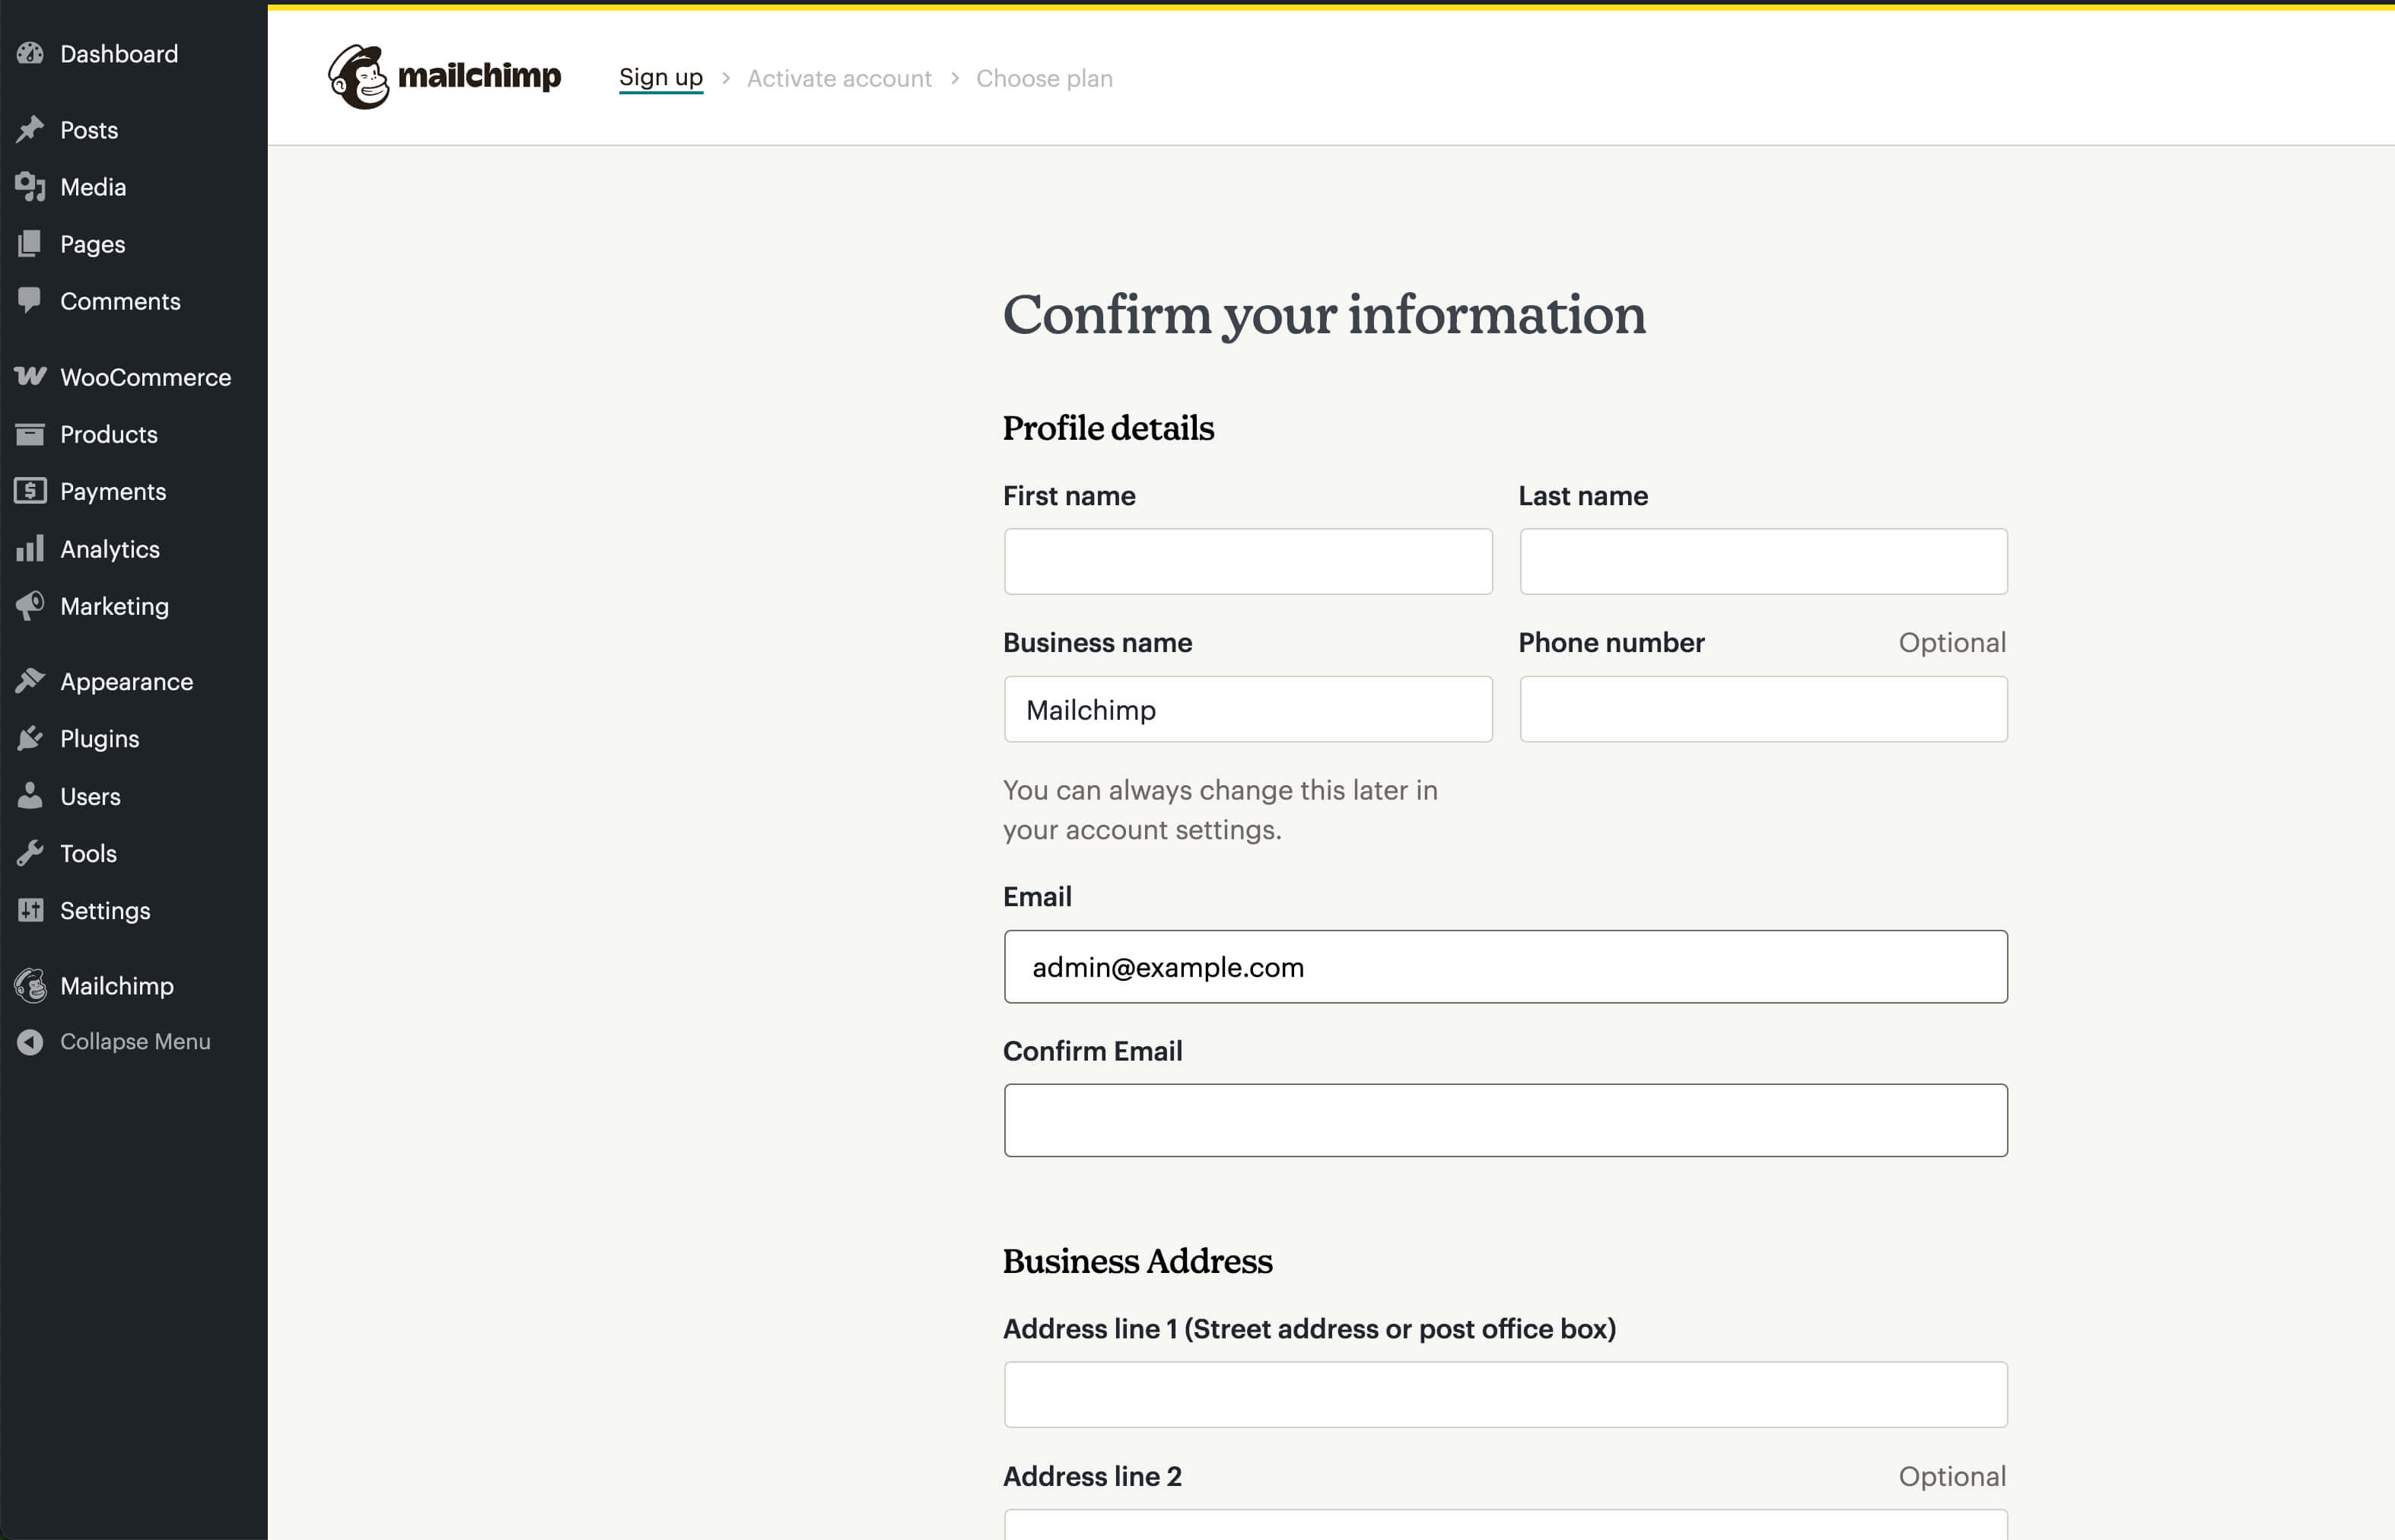
Creating a new Mailchimp account.
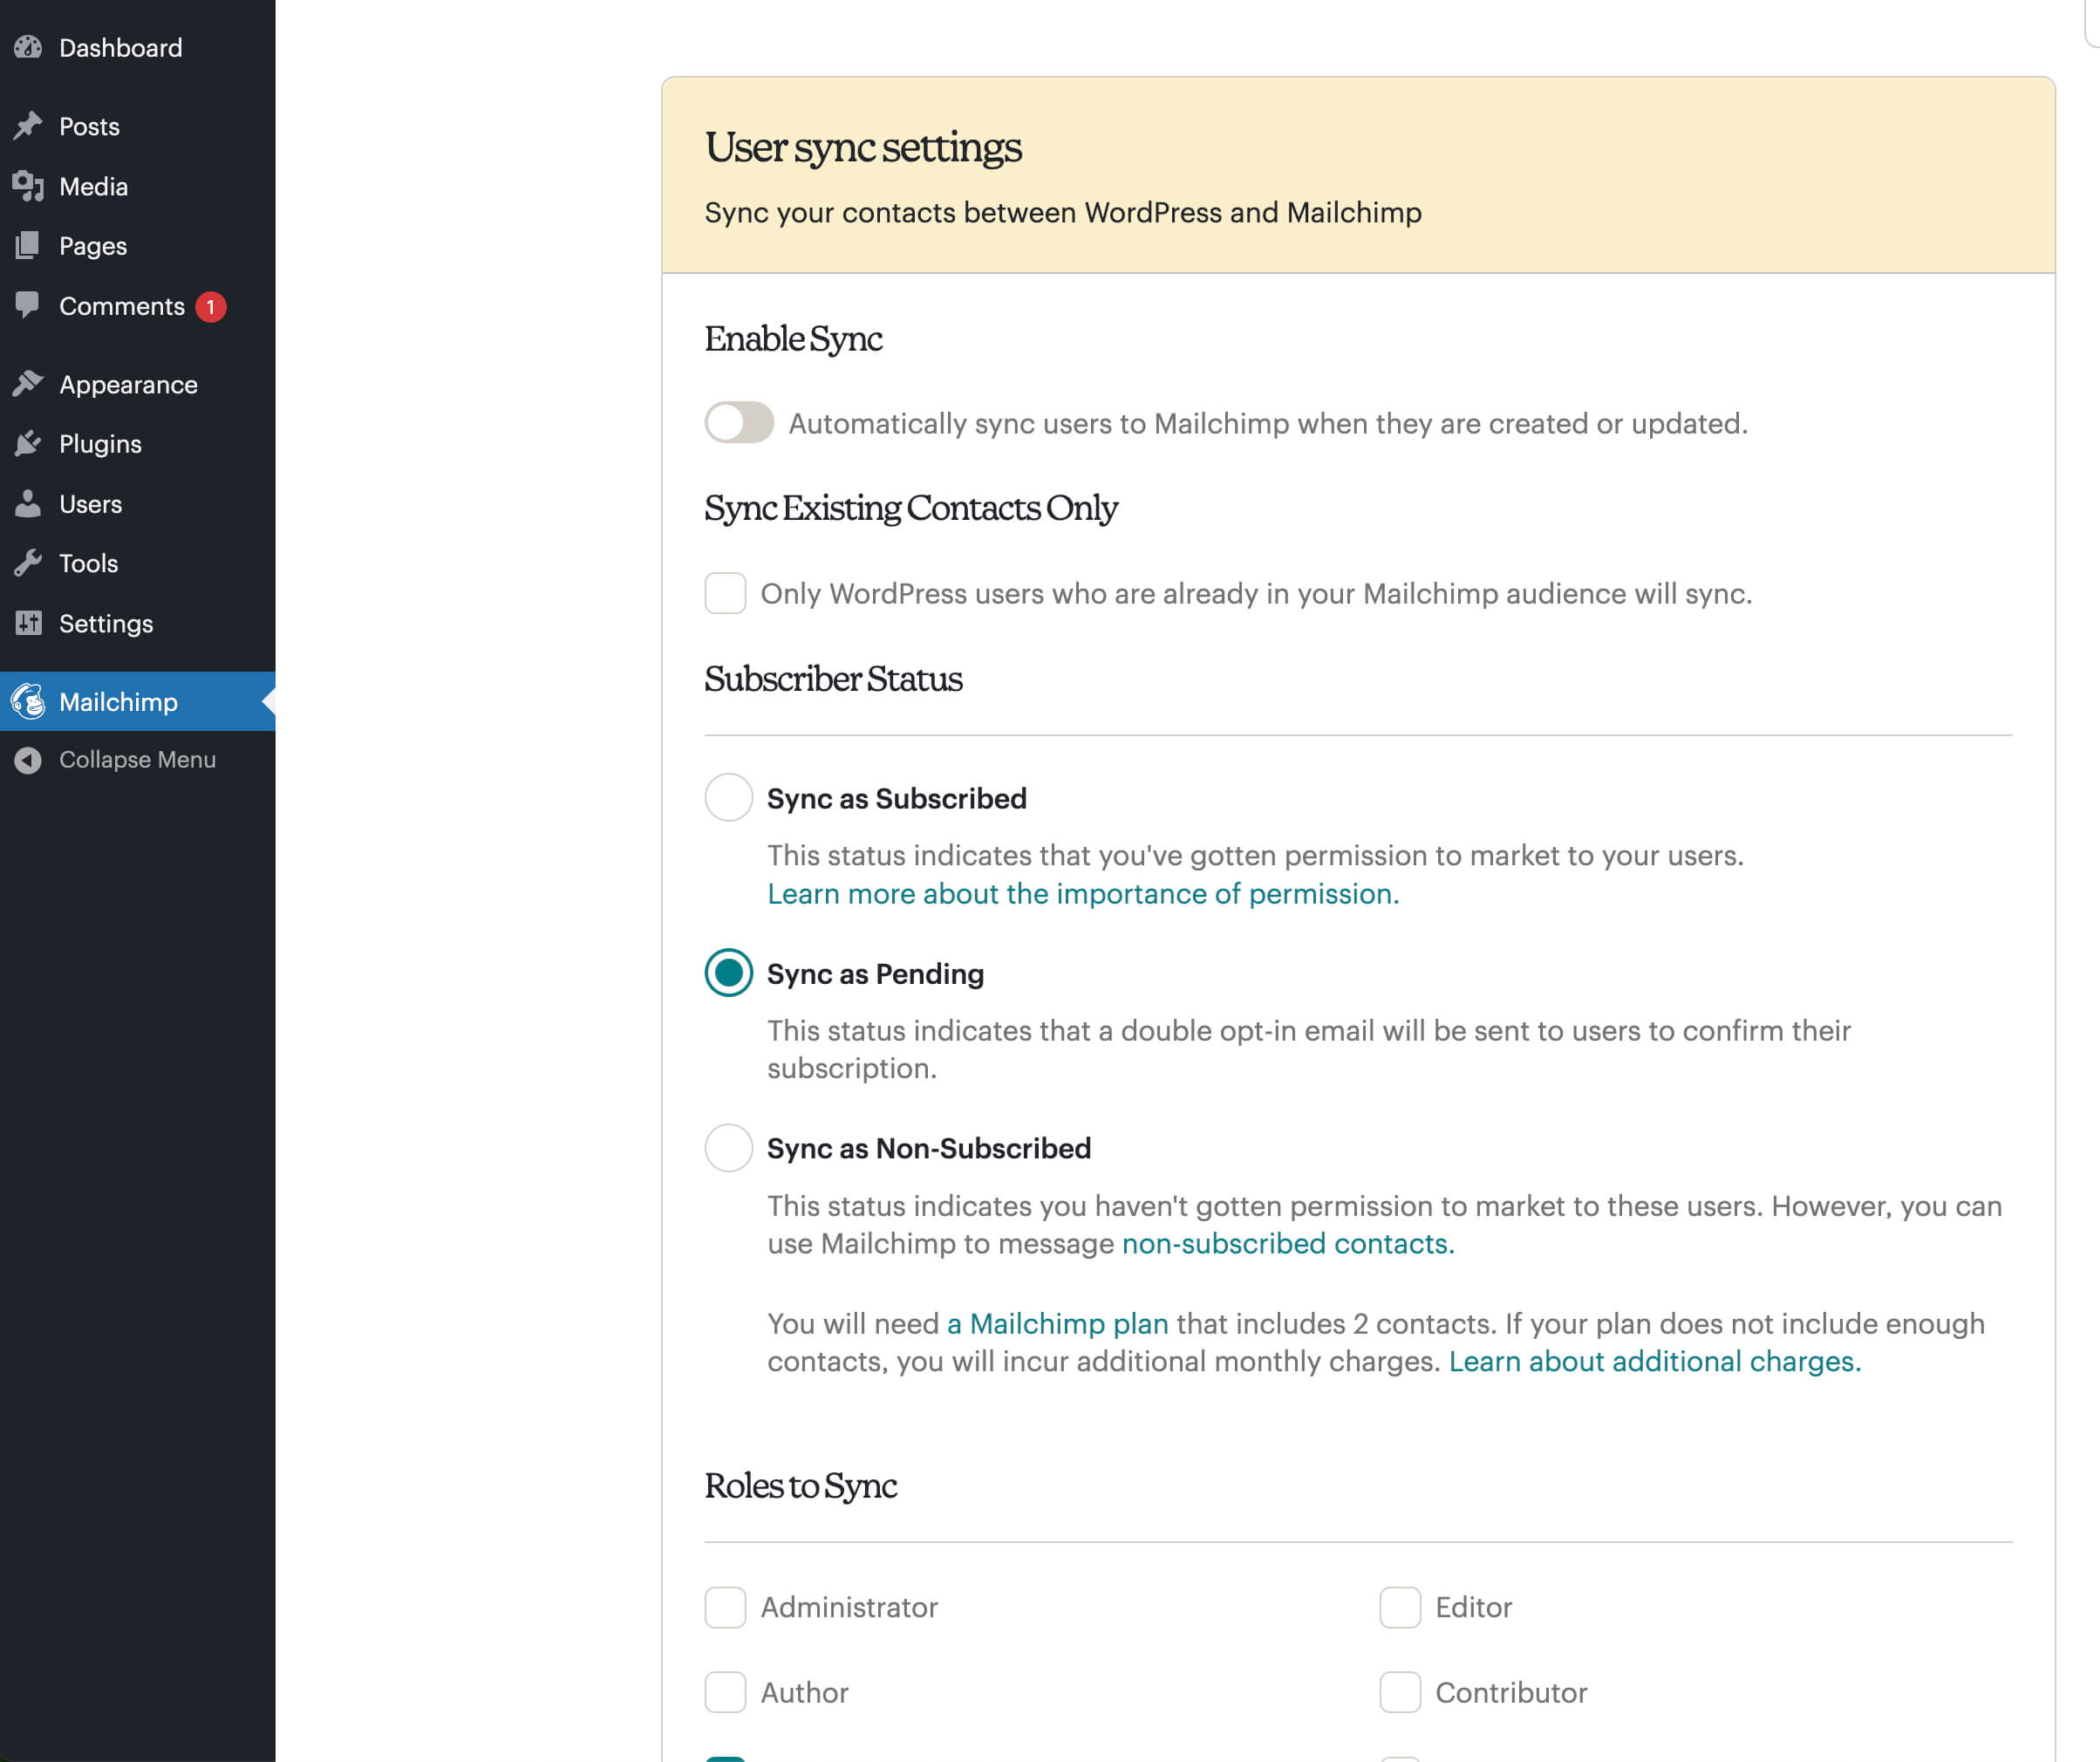
Configuring user synchronization settings.
Changelog
2.0.0 – 2025-08-11
- Added: Form templates to the Mailchimp List Subscribe Form block, allowing users to quickly insert and publish specific forms (props @iamdharmesh, Romain Deville, @vikrampm1, @jeffpaul, @dkotter, @qasumitbagthariya via #171).
- Changed: Improved navigation and UX enhancements to the plugin settings page (props @iamdharmesh, Romain Deville, @jeffpaul, @dkotter, @qasumitbagthariya via #169).
- Changed: Allowed multiple Mailchimp forms on a single page (props @iamdharmesh, @jeffpaul, @dkotter, @qasumitbagthariya via #173).
- Changed: Update the form ID attribute and form field ID attributes (if you’re using ID selectors for custom styling, please update the selectors accordingly) (props @iamdharmesh, @jeffpaul, @dkotter, @qasumitbagthariya via #173).
- Fixed: Phone number and required field validations (props @iamdharmesh, @MaxwellGarceau, @jeffpaul, @dkotter, @qasumitbagthariya via #159).
- Security: Bump
tar-fsfrom 2.1.1 to 3.1.0 (props @dependabot, @iamdharmesh via #175). - Security: Bump
form-datafrom 2.3.3 to 2.5.5 and@cypress/requestfrom 3.0.1 to 3.0.9 (props @dependabot, @iamdharmesh via #176). - Security: Bump
@babel/runtimefrom 7.24.6 to 7.28.2 (props @dependabot, @iamdharmesh via #177). - Security: Bump
on-headersfrom 1.0.2 to 1.1.0 andcompressionfrom 1.7.4 to 1.8.1 (props @dependabot, @iamdharmesh via #178). - Security: Bump
serialize-javascriptfrom 6.0.0 to 6.0.2 andmochafrom 10.4.0 to 11.7.1 (props @dependabot, @iamdharmesh via #179). - Security: Bump
http-proxy-middlewarefrom 2.0.6 to 2.0.9 (props @dependabot, @iamdharmesh via #180).
1.9.0 – 2025-06-04
- Added: New user synchronization feature that allows syncing WordPress users to Mailchimp (props @iamdharmesh, @jeffpaul, @dkotter, @qasumitbagthariya via #156).
- Changed: Improved the enqueueing of JavaScript scripts and styles (props @iamdharmesh, @dkotter, @qasumitbagthariya via #161).
1.8.0 – 2025-05-08
Note that this release bumps the WordPress minimum version from 6.3 to 6.4.
- Added: Honeypot and no-JS fields to help prevent spam (props @iamdharmesh, @dkotter, @jeffpaul, @qasumitbagthariya via #139).
- Added: Confirmation prompt before logging out the user (props @iamdharmesh, @dkotter, @qasumitbagthariya via #149).
- Added: A note advising users to set the website URL in the Mailchimp Audience settings (props @iamdharmesh, @MaxwellGarceau, @dkotter, @qasumitbagthariya via #145).
- Changed: Bump WordPress “tested up to” version 6.8 (props @qasumitbagthariya, @dkotter via #148).
- Changed: Bump WordPress minimum supported version from 6.3 to 6.4 (props @qasumitbagthariya, @dkotter via #148).
1.7.0 – 2025-04-08
- Changed: Enhance the Mailchimp List Subscribe Form block to allow for selecting an audience list, reorder fields, toggle field and group visibility, and various other improvements (props @iamdharmesh, @jeffpaul, @dkotter, @qasumitbagthariya via #126).
- Changed: Plugin settings page success and error messages will now use WP admin notices (props @MaxwellGarceau, @jeffpaul, @dkotter, @qasumitbagthariya, @iamdharmesh via #85).
- Changed: Renamed
mailchimp_sf_global_msgfunction tomailchimp_sf_frontend_msgto differentiate functionality from WP admin notices that are used exclusively in the WP Admin (props @MaxwellGarceau, @jeffpaul, @dkotter, @qasumitbagthariya, @iamdharmesh via #85). - Changed: Make the form field visibility dependent on the WordPress “Include?” settings instead of the Mailchimp settings (props @iamdharmesh, @jeffpaul, @dkotter, @qasumitbagthariya, @MaxwellGarceau via #137).
- Fixed: Ensure that form data persists when validation fails (props @iamdharmesh, @jeffpaul, @dkotter, @qasumitbagthariya, @MaxwellGarceau via #130).
- Fixed: Display an error message informing users that they must subscribe through the hosted form if they were previously unsubscribed (props @iamdharmesh, @dkotter, @qasumitbagthariya, @MaxwellGarceau via #131, #140).
- Removed: The “CSS Cheat Sheet” section from the Mailchimp settings page (props @iamdharmesh, @jeffpaul, @dkotter, @qasumitbagthariya via #126).
- Removed: The “Use JavaScript Support?” option from the Mailchimp settings page (props @iamdharmesh, @jeffpaul, @dkotter, @qasumitbagthariya via #126).
- Removed: The “Use JavaScript Datepicker?” option from the Mailchimp settings page (props @iamdharmesh, @jeffpaul, @dkotter, @qasumitbagthariya via #126).
- Removed: The “Custom Styling” settings from the Mailchimp settings page (props @iamdharmesh, @jeffpaul, @dkotter, @qasumitbagthariya via #126).
- Removed: The “Remove Mailchimp CSS” settings from the Mailchimp settings page (props @iamdharmesh, @jeffpaul, @dkotter, @qasumitbagthariya via #126).
- Security: Bump
expressfrom 4.21.0 to 4.21.2 (props @dependabot, @iamdharmesh, @dkotter via #125).
1.6.3 – 2025-01-30
- Added: Transform the
mailchimp_sf_shortcodeshortcode to the Mailchimp List Subscribe Form block (props @MaxwellGarceau, @jeffpaul, @dkotter, @qasumitbagthariya via #84). - Removed: Deprecated Sopresto code (props @MaxwellGarceau, @jeffpaul, @dkotter via #98).
- Fixed: Fatal PHP error that would occur when the phone merge field was set to US format, but the merge field was not included in the Mailchimp plugin (props @MaxwellGarceau, @jeffpaul, @dkotter, @qasumitbagthariya via #108).
- Fixed: Bug causing merge fields on the Mailchimp WP admin page to incorrectly display as not required when they were, in fact, required (props @MaxwellGarceau, @jeffpaul, @dkotter, @qasumitbagthariya via #109).
- Fixed: Fix an issue that allows a user to select merge fields that were not selected as visible in the Mailchimp account (props @MaxwellGarceau, @jeffpaul, @dkotter, @qasumitbagthariya via #110).
- Fixed: Bug causing all new subscribers to receive a double opt-in email (props Nathan Tetzlaff, @MaxwellGarceau, @jeffpaul, @dkotter, @qasumitbagthariya via #115).
- Fixed: Bug causing contacts with any Mailchimp status (subscribed, unsubscribed, pending, etc.) to be able to submit the sign-up form even if “Update Existing Subscriber?” was disabled (props @MaxwellGarceau, @jeffpaul, @dkotter, @qasumitbagthariya via #115).
- Fixed: Pending contacts will now still be required to confirm their original confirmation email if they try to update their contact while “Update Existing Subscribers?” and “Double Opt-in” are both enabled (props @MaxwellGarceau, @jeffpaul, @dkotter, @qasumitbagthariya via #115).
- Security: Bump
nanoidfrom 3.3.7 to 3.3.8 (props @dependabot, @iamdharmesh via #111).
1.6.2 – 2024-11-12
Note that this release bumps the WordPress minimum version from 6.1 to 6.3.
- Changed: Bump WordPress “tested up to” version 6.7 (props @qasumitbagthariya, @vikrampm1, @dkotter via #71).
- Changed: Bump WordPress minimum supported version from 6.1 to 6.3 (props @qasumitbagthariya, @vikrampm1, @dkotter via #71).
- Fixed: Ensure the field name is properly added to the error message when the email address is blank (props @iamdharmesh, @jerclarke, @dkotter via #74).
1.6.1 – 2024-10-14
- Changed: Improved migration flow from API Key to OAuth authentication for a better user experience (props @iamdharmesh, @jeffpaul, @dkotter, @qasumitbagthariya via #67).
- Changed: Updated the menu SVG icon (props @dkotter, @jeffpaul via #65).
- Fixed: Ensure that the settings remain persistent between logging out of the account and logging in again (props @iamdharmesh, @jeffpaul, @dkotter, @qasumitbagthariya via #66).
- Security: Bump
serve-staticfrom 1.15.0 to 1.16.2 andexpressfrom 4.19.2 to 4.21.0 (props @dependabot, @dkotter via #55). - Security: Bump
webpackfrom 5.91.0 to 5.94.0 (props @dependabot, @dkotter via #59).
1.6.0 – 2024-09-24
Note this version increased the WordPress minimum version to 6.1 and the PHP minimum version to 7.0.
- Added: Mailchimp List Subscribe Form custom block (props @nateconley, @dkotter, @jeffpaul via #35, #38).
- Added: PHP 8.3 compatibility and minimum PHP version of 7.0 (props @nateconley, @jeffpaul, @dkotter via #26).
- Added: WordPress 6.5 compatibility (props @nateconley, @dkotter, @jeffpaul via #27).
- Added: OAuth authentication for connecting a Mailchimp account with WordPress (props @iamdharmesh, @dkotter, @jeffpaul via #47, #48, #50, #52).
- Added: New user signup flow, allowing users to sign up for a Mailchimp account from within the plugin (props @iamdharmesh, @dkotter, @jeffpaul via #51).
- Added: Created a
LICENSE.mdfile and sets the license in the plugin toGPL-2.0-or-later(props @jeffpaul, @dkotter via #14). - Added: Plugin icon and banner assets (props @eddieshrake, @jeffpaul, @dkotter via #28).
- Changed: Bump WordPress “tested up to” version 6.6 (props @qasumitbagthariya, @vikrampm1, @jeffpaul via #43).
- Changed: Ensure the signup form is only visible when a list is selected in the settings (props @iamdharmesh, @dkotter, @qasumitbagthariya via #54).
- Changed: Moved settings page and link to top-level WP Admin menu item (props @nateconley, @dkotter, @jeffpaul via #29, #33).
- Changed: Admin styles to match updated Mailchimp brand guidelines (props @nateconley, @dkotter, @jeffpaul, @eddieshrake via #31).
- Changed: Replaced references of MailChimp to Mailchimp except where those references are explicitly functional code (to limit the additional class/function updates needed) (props @jeffpaul, @dkotter via #14).
- Changed: Updated
readme.txtandmailchimp.phpheader values to the WP.org standards (props @jeffpaul, @dkotter via #14). - Changed: Moved screenshots into a new
.wordpress-orgdirectory (props @jeffpaul, @dkotter via #14). - Changed: Moved translations to GlotPress (props @nateconley, @dkotter, @jeffpaul via #39).
- Deprecated: Function
mailchimpSF_signup_formdeprecated in favor ofmailchimp_sf_signup_form(props @nateconley, @dkotter via #24). - Deprecated: jQuery scrollTo (props @nateconley, @dkotter, @jeffpaul via #27).
- Removed: Support for WordPress < 6.1.1 (props @nateconley, @dkotter, @jeffpaul via #27).
- Removed: Polyfills for WordPress < 2.8.0 (props @nateconley, @dkotter, @jeffpaul via #27).
- Removed: Monkey Rewards integration (props @nateconley, @dkotter, @jeffpaul via #30).
- Removed: IE-specific admin stylesheet (props @nateconley, @dkotter, @jeffpaul, @eddieshrake via #31).
- Fixed: Formatting from linting checks (props @nateconley, @dkotter via #23).
- Fixed: Datepicker display on frontend (props @nateconley, @dkotter, @jeffpaul via #25).
- Fixed: Accessibility for admin settings page (props @nateconley, @dkotter, @jeffpaul, @eddieshrake via #31).
- Fixed: Properly handle the scenario where a non-valid list is updated (props @dkotter, @qasumitbagthariya, @nateconley, @vikrampm1 via #40).
- Fixed: Ensure the custom block and shortcode both have consistent spacing (props @dkotter, @qasumitbagthariya, @nateconley, @vikrampm1 via #41).
- Fixed: Address some PHP warnings when a form submission happens (props @iamdharmesh, @dkotter, @qasumitbagthariya via #54).