WP Telegram (Auto Post and Notifications)
Integrate your WordPress site perfectly with Telegram with full control.
Plugin info
Maintenance & Compatibility
Maintenance score
Maintained • Last updated 161 days ago • Support resolved 100% • 422 reviews
Is WP Telegram (Auto Post and Notifications) abandoned?
Likely maintained (last update 161 days ago).
Compatibility
Developers
Similar & Alternatives
Explore plugins with similar tags, and compare key metrics like downloads, ratings, updates, support, and WP/PHP compatibility.
Description
Integrate your WordPress site perfectly with Telegram with full control.
Modules
1. Post to Telegram
- 📝 Send posts automatically to Telegram when published or updated
- 📢 You can send to a Telegram Channel, Group, Supergroup or private chat
- 👥 Supports multiple Channels/chats
- 🙂 Has Message Template composer with Emojis
- ⏳ Supports Conditional logic inside Message Template
- 🖼 Supports sending featured image along with the text
- 🏞 You can choose to send only the Featured Image
- ⏱ Supports scheduled (future) posts
- 🕰 Messages can be delayed by a specific interval
- ⬜️ You can add an Inline button for the post URL
- 🛒 Supports WooCommerce products and other Custom Post Types
- ✒️ Direct Support for sending Custom Fields
- 🗃 You can send Custom Taxonomy Terms
- 📋 You can select the post types to be sent
- ⏲ You can choose when to send (New and/or existing posts)
- 🎛 Make use of Custom Rules to filter posts by authors, categories, tags, post formats or custom taxonomy terms
- 🎚 You can override the default settings on post edit page
WP Telegram Pro supports multiple channels based upon category/tag/author/post type etc. and also supports unlimited Reaction buttons.
2. Private Notifications
- 📧 Get your email notifications on Telegram
- 🔔 Supports WooCommerce order notifications, Contact Form 7 and other plugin notifications
- 🔕 Allow users to receive their email notifications on Telegram
- 🔐 Integrated with WP Telegram Login to let users connect their Telegram.
- 🖊 Users can also enter their Telegram Chat ID manually on page
3. Proxy
- 🚫 If your host blocks Telegram, you can use this module
- ✅ Bypass the ban on Telegram by making use of proxy
- 🚀 Supports Cloudflare worker as proxy which supports file upload
- 😍 Option to use custom Google Script as proxy
- ❇️ Supports all proxies supported by PHP
- 🔛 You can select Proxy type – HTTP, SOCKS4, SOCKS4A, SOCKS5, SOCKS5_HOSTNAME
Features
- Excellent LIVE Support on Telegram
- Easy to install and set up for the admin
- Fully customizable with actions and filters
- Can be extended with custom code
- Translation ready
Getting Started | Post to Telegram
WooCommerce, CF7 etc. Notifications
Contribution
Development takes place in our Github monorepo, and all contributions welcome.
Excellent LIVE Support on Telegram
Join the Chat
We have a public group on Telegram to provide help setting up the plugin, discuss issues, features, translations etc. Join @WPTelegramChat
For rules, see the pinned message. No spam please.
Get in touch
- Website wpsocio.com
- Telegram @WPTelegram
- Facebook @WPTelegram
- Twitter @WPTelegram
Upgrade to Pro
WP Telegram Pro comes with more powerful features to give you more control. Upgrade NOW
Installation
Automatic installation
Automatic installation is the easiest way — WordPress will handle the file transfer, and you won’t need to leave your web browser. To do an automatic install of the plugin:
- Log in to your WordPress dashboard
- Navigate to the Plugins menu, and click “Add New”
- In the search field type “wptelegram” and hit Enter
- Locate the plugin in the list of search results
- Click on “Install Now” and wait for the installation to complete
- Click on “Activate”
Manual installation
Manual installation method requires downloading the plugin and uploading it to your web server via your favorite FTP application. The official WordPress documentation contains instructions on how to do this here.
Updating
Automatic updates should work smoothly, but we still recommend you back up your site.
Frequently Asked Questions
To create a bot, you need to send /newbot command to @BotFather. After completing the steps @BotFather will provide you the Bot Token, which you can use in plugin settings.
Yes, you need to get the chat ID of the channel or group. For that, you need to message @MyChatInfoBot and follow its instructions to obtain the ID for a channel or group.
It means either you have entered a wrong chat ID in the settings or you forgot to add your own bot to the group or channel. Some users also enter the bot username instead of the channel username.
If you see that error in Bot API log file, it means that there is some problem with your images/files that you are trying to send to Telegram. You can try to disable Send files by URL option in Advanced Settings to see if it fixes the issue. More details here.
If your host is in Russia or Iran or it’s a free hosting, your host most likely blocks Telegram. You can activate and set up the Proxy module of the plugin to bypass the ban.
There can be many reasons for that. To better understand the reason, you can enable both the logs in Advanced Settings and then try to send the post again, then share the logs with our support on Telegram – @WPTelegramSupport.
It may be because you hit update button without makes any changes to the post.
It can happen because of multiple submit/publish/update requests, for example in block editor. An easy solution would be to set 1 minute delay in posting in Post to Telegram settings.
The users submitting those posts may not have enough permissions to publish/edit those posts. You can enable Plugin generated posts option in Post to Telegram settings to fix the issue.
Sending of posts when bulk importing is disabled by default to prevent unintended flooding of Telegram channels. If you want to enable it, you can add this one line to functions.php of your child theme.
add_filter( 'wptelegram_p2tg_send_if_importing', '__return_true' );
You can use <b>{post_title}</b> in the template and set Formatting option to HTML. More details here.
That is possible only in Pro version.
Private Notifications module watches every email that is sent from your WordPress Website. If the address of that email matches the one added in plugin settings, then that email is sent to Telegram on the given chat/group as added in the settings.
Private Notifications module watches every email that is sent from your WordPress Website. When you enable User Notifications, you need to connect your users’ accounts to their Telegram accounts. Once you do that, then whenever an email is sent to a user, the plugin finds its connected Telegram account and forwards the email to that Telegram account. So, it works for any plugin/system that sends email notifications.
Yes, all you need to do is to setup Private Notifications module and use the same email there as set in WooCommerce order email settings.
Yes, all you need to do is to setup Private Notifications module and use the same email there as set in “To” field of Mail settings section of the Contact Form.
Review feed
Good plugin, great support
Reliable way of notifying customers
Great Plugin for Posting to Telegram
Great Plugin for Telegram Integration
Noiseless plugin
Screenshots
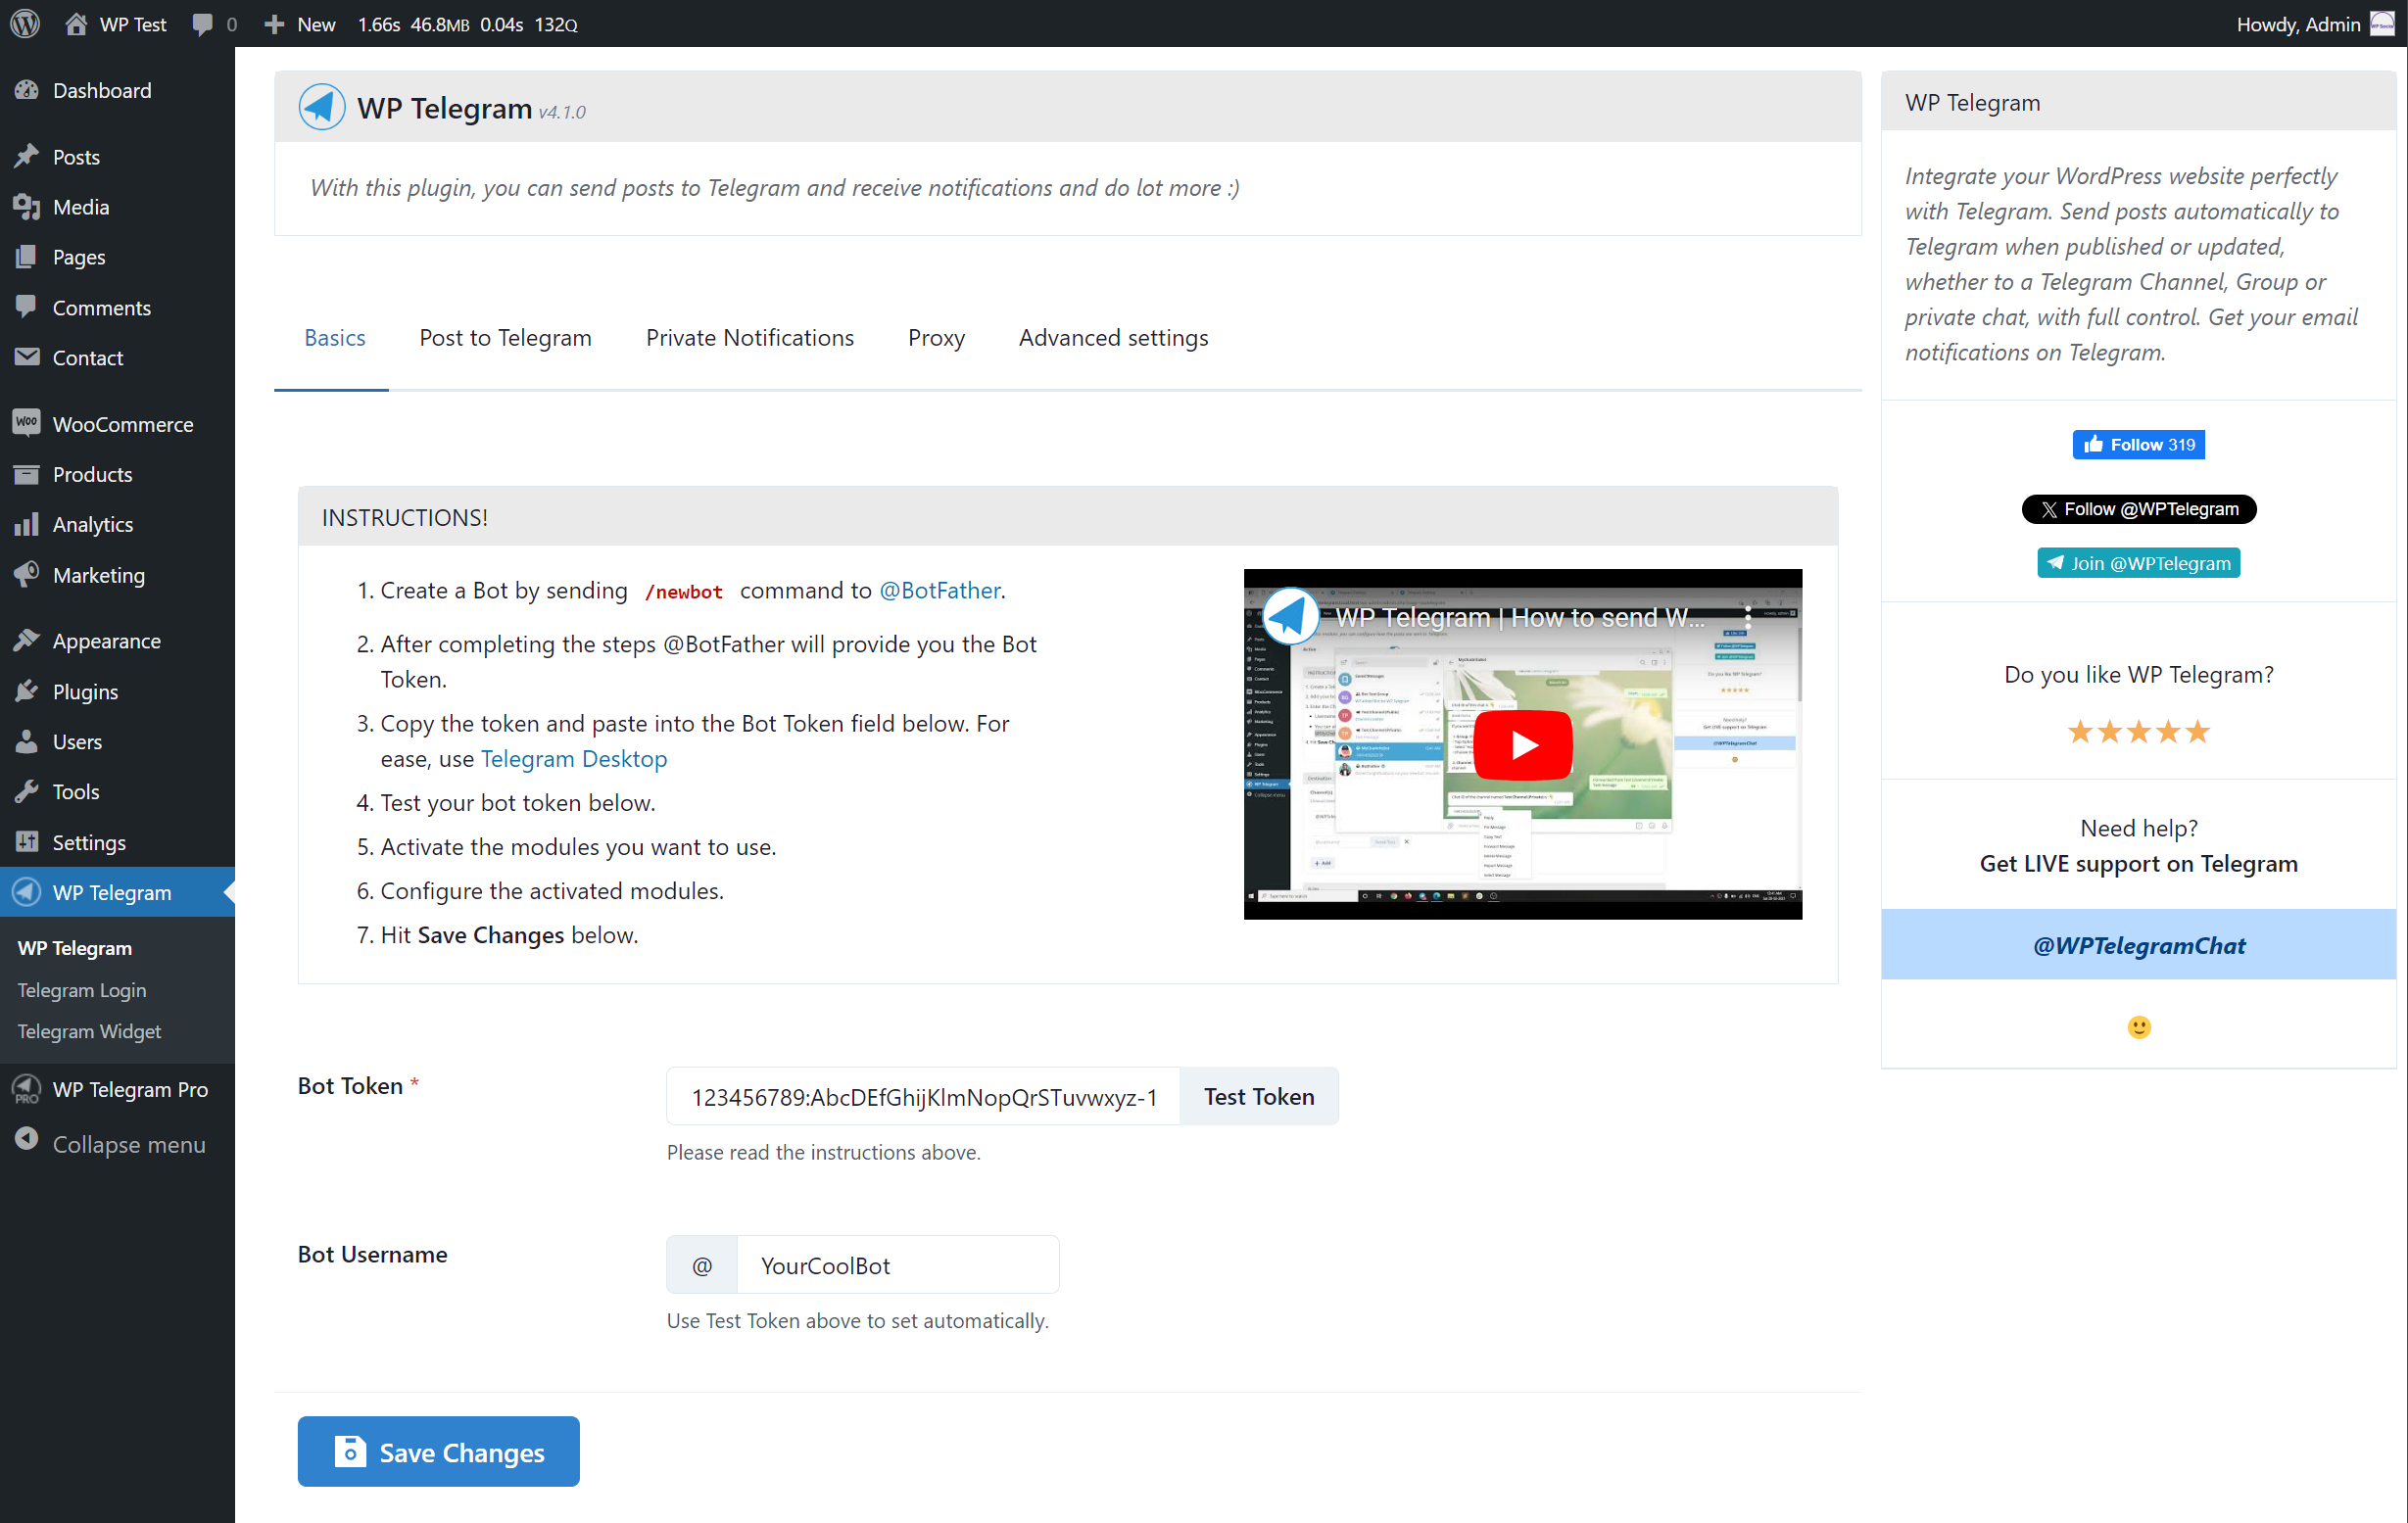
Basic Settings

Post To Telegram Settings

Post To Telegram Settings (Cont...)

Post To Telegram Settings (Cont...)

Post To Telegram Settings (Cont...)
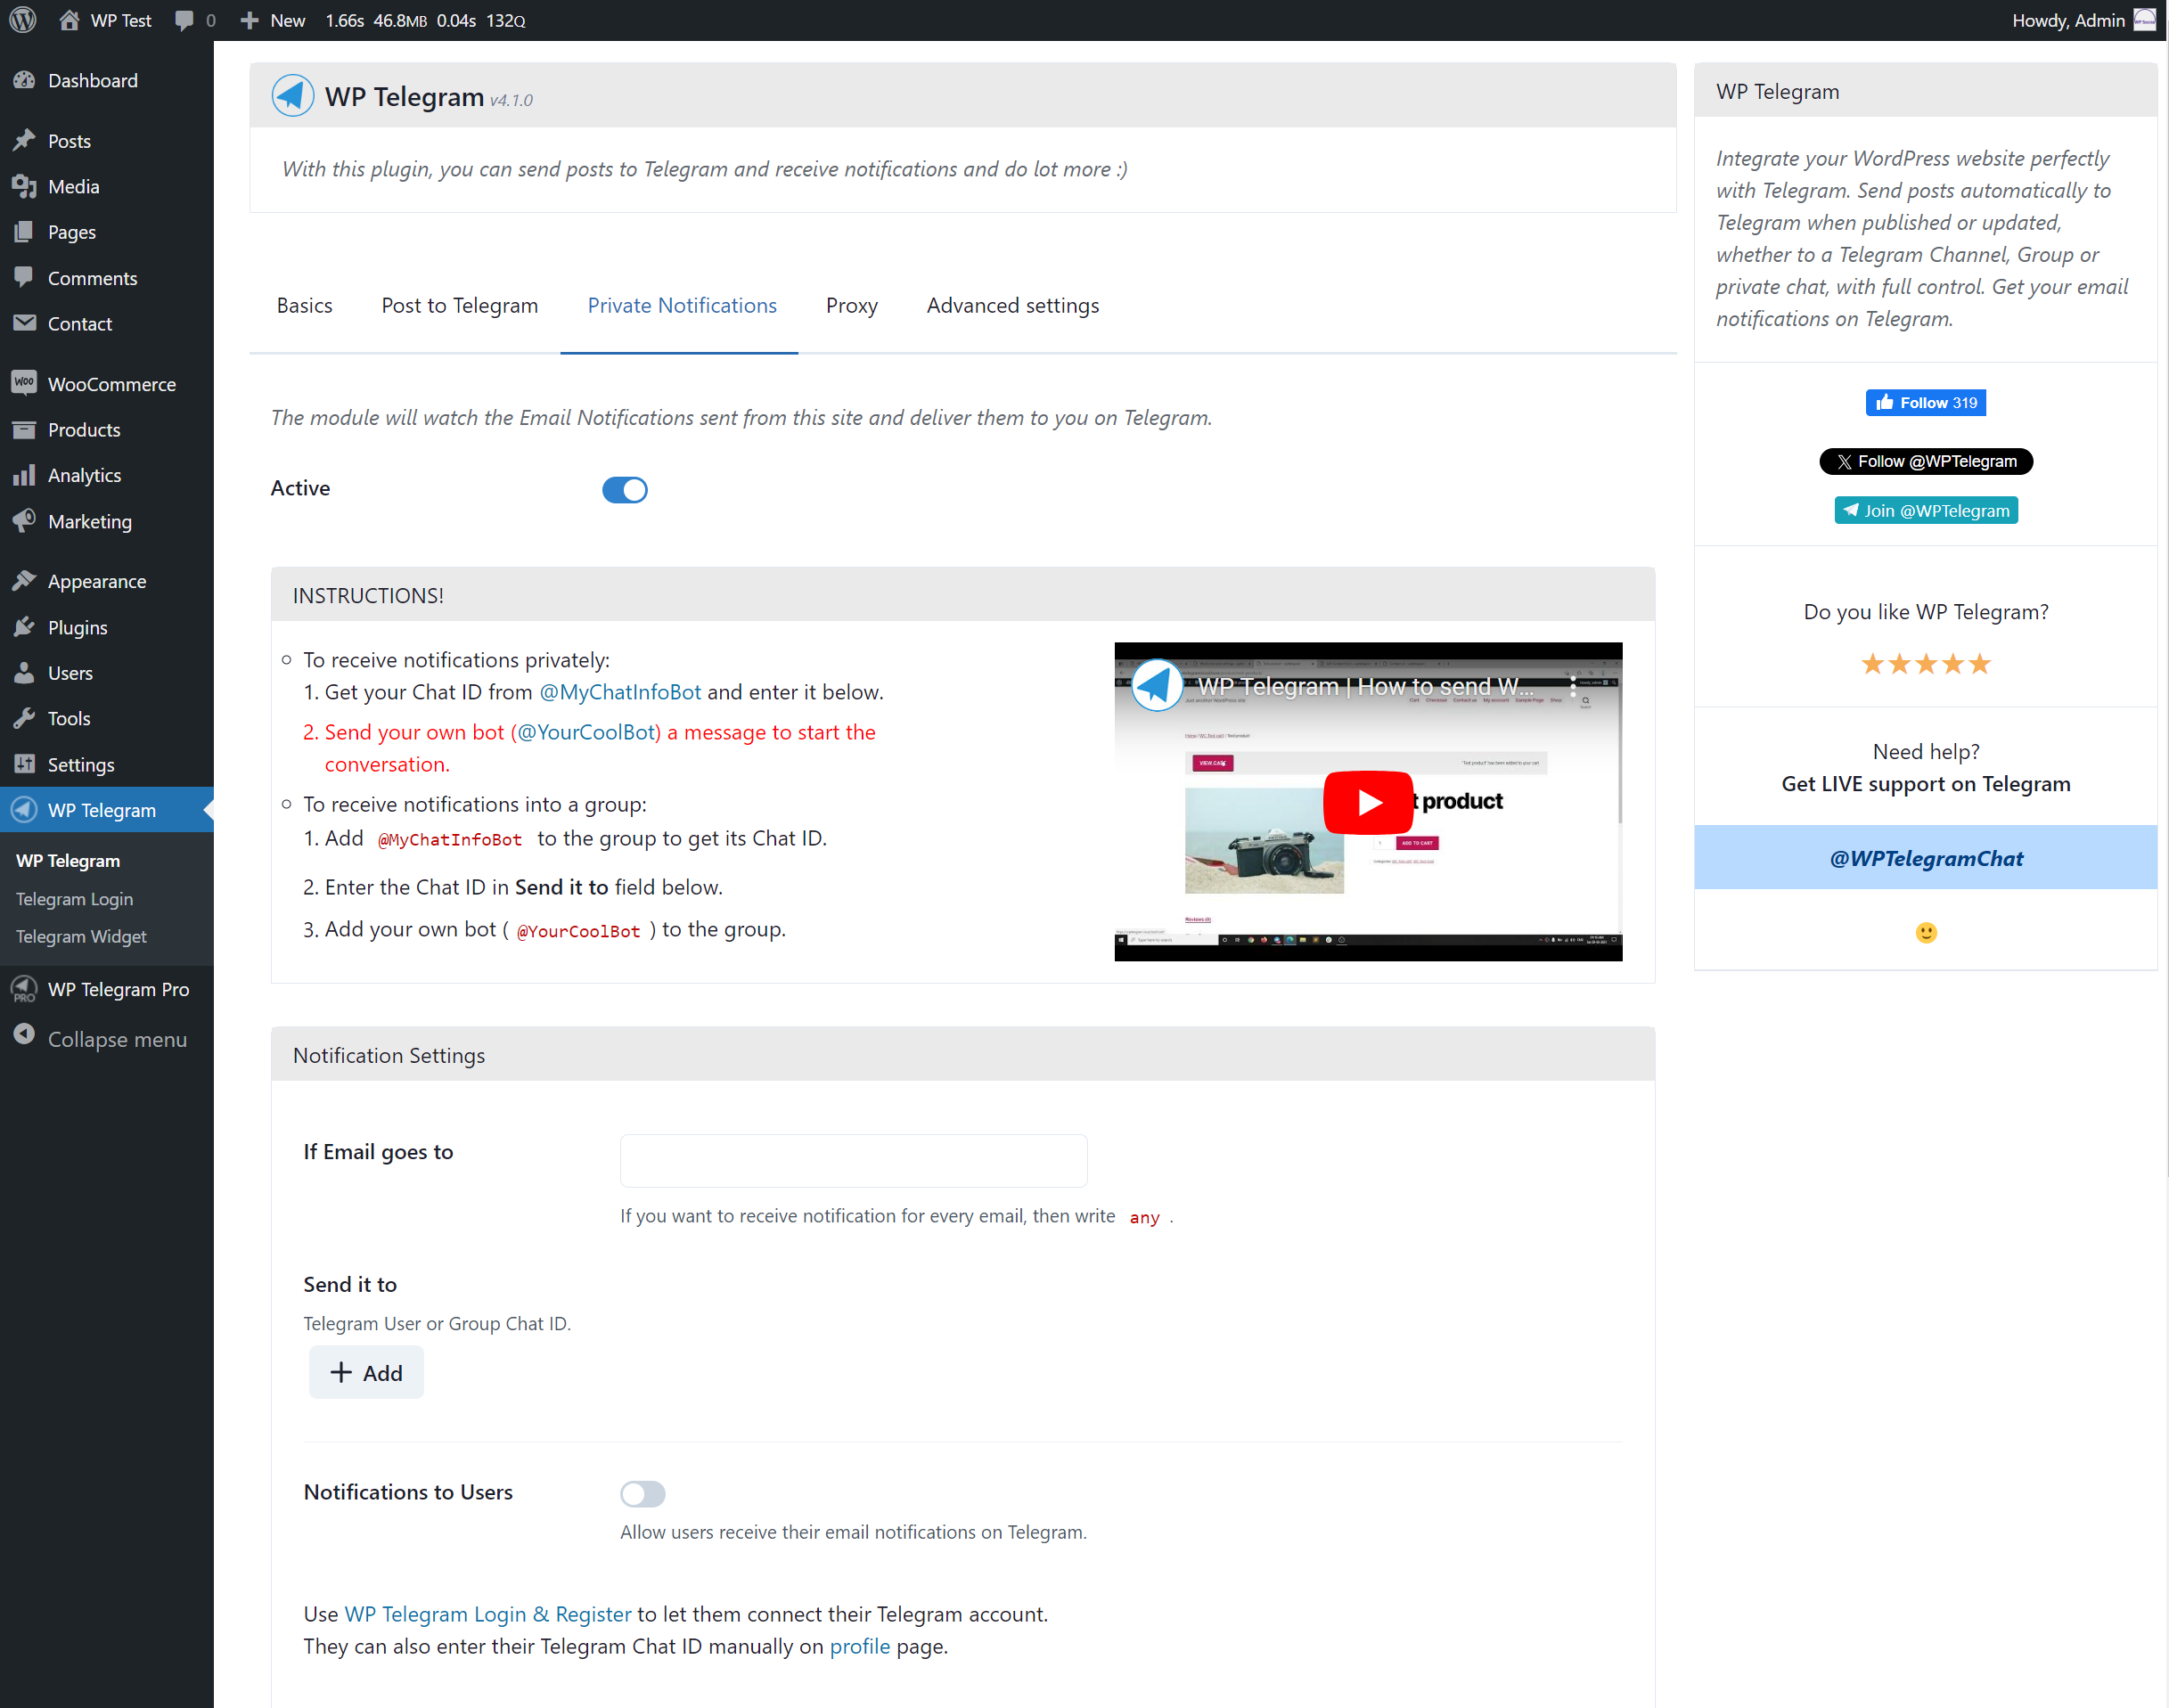
Private Notifications Settings

Private Notifications Settings (Cont...)
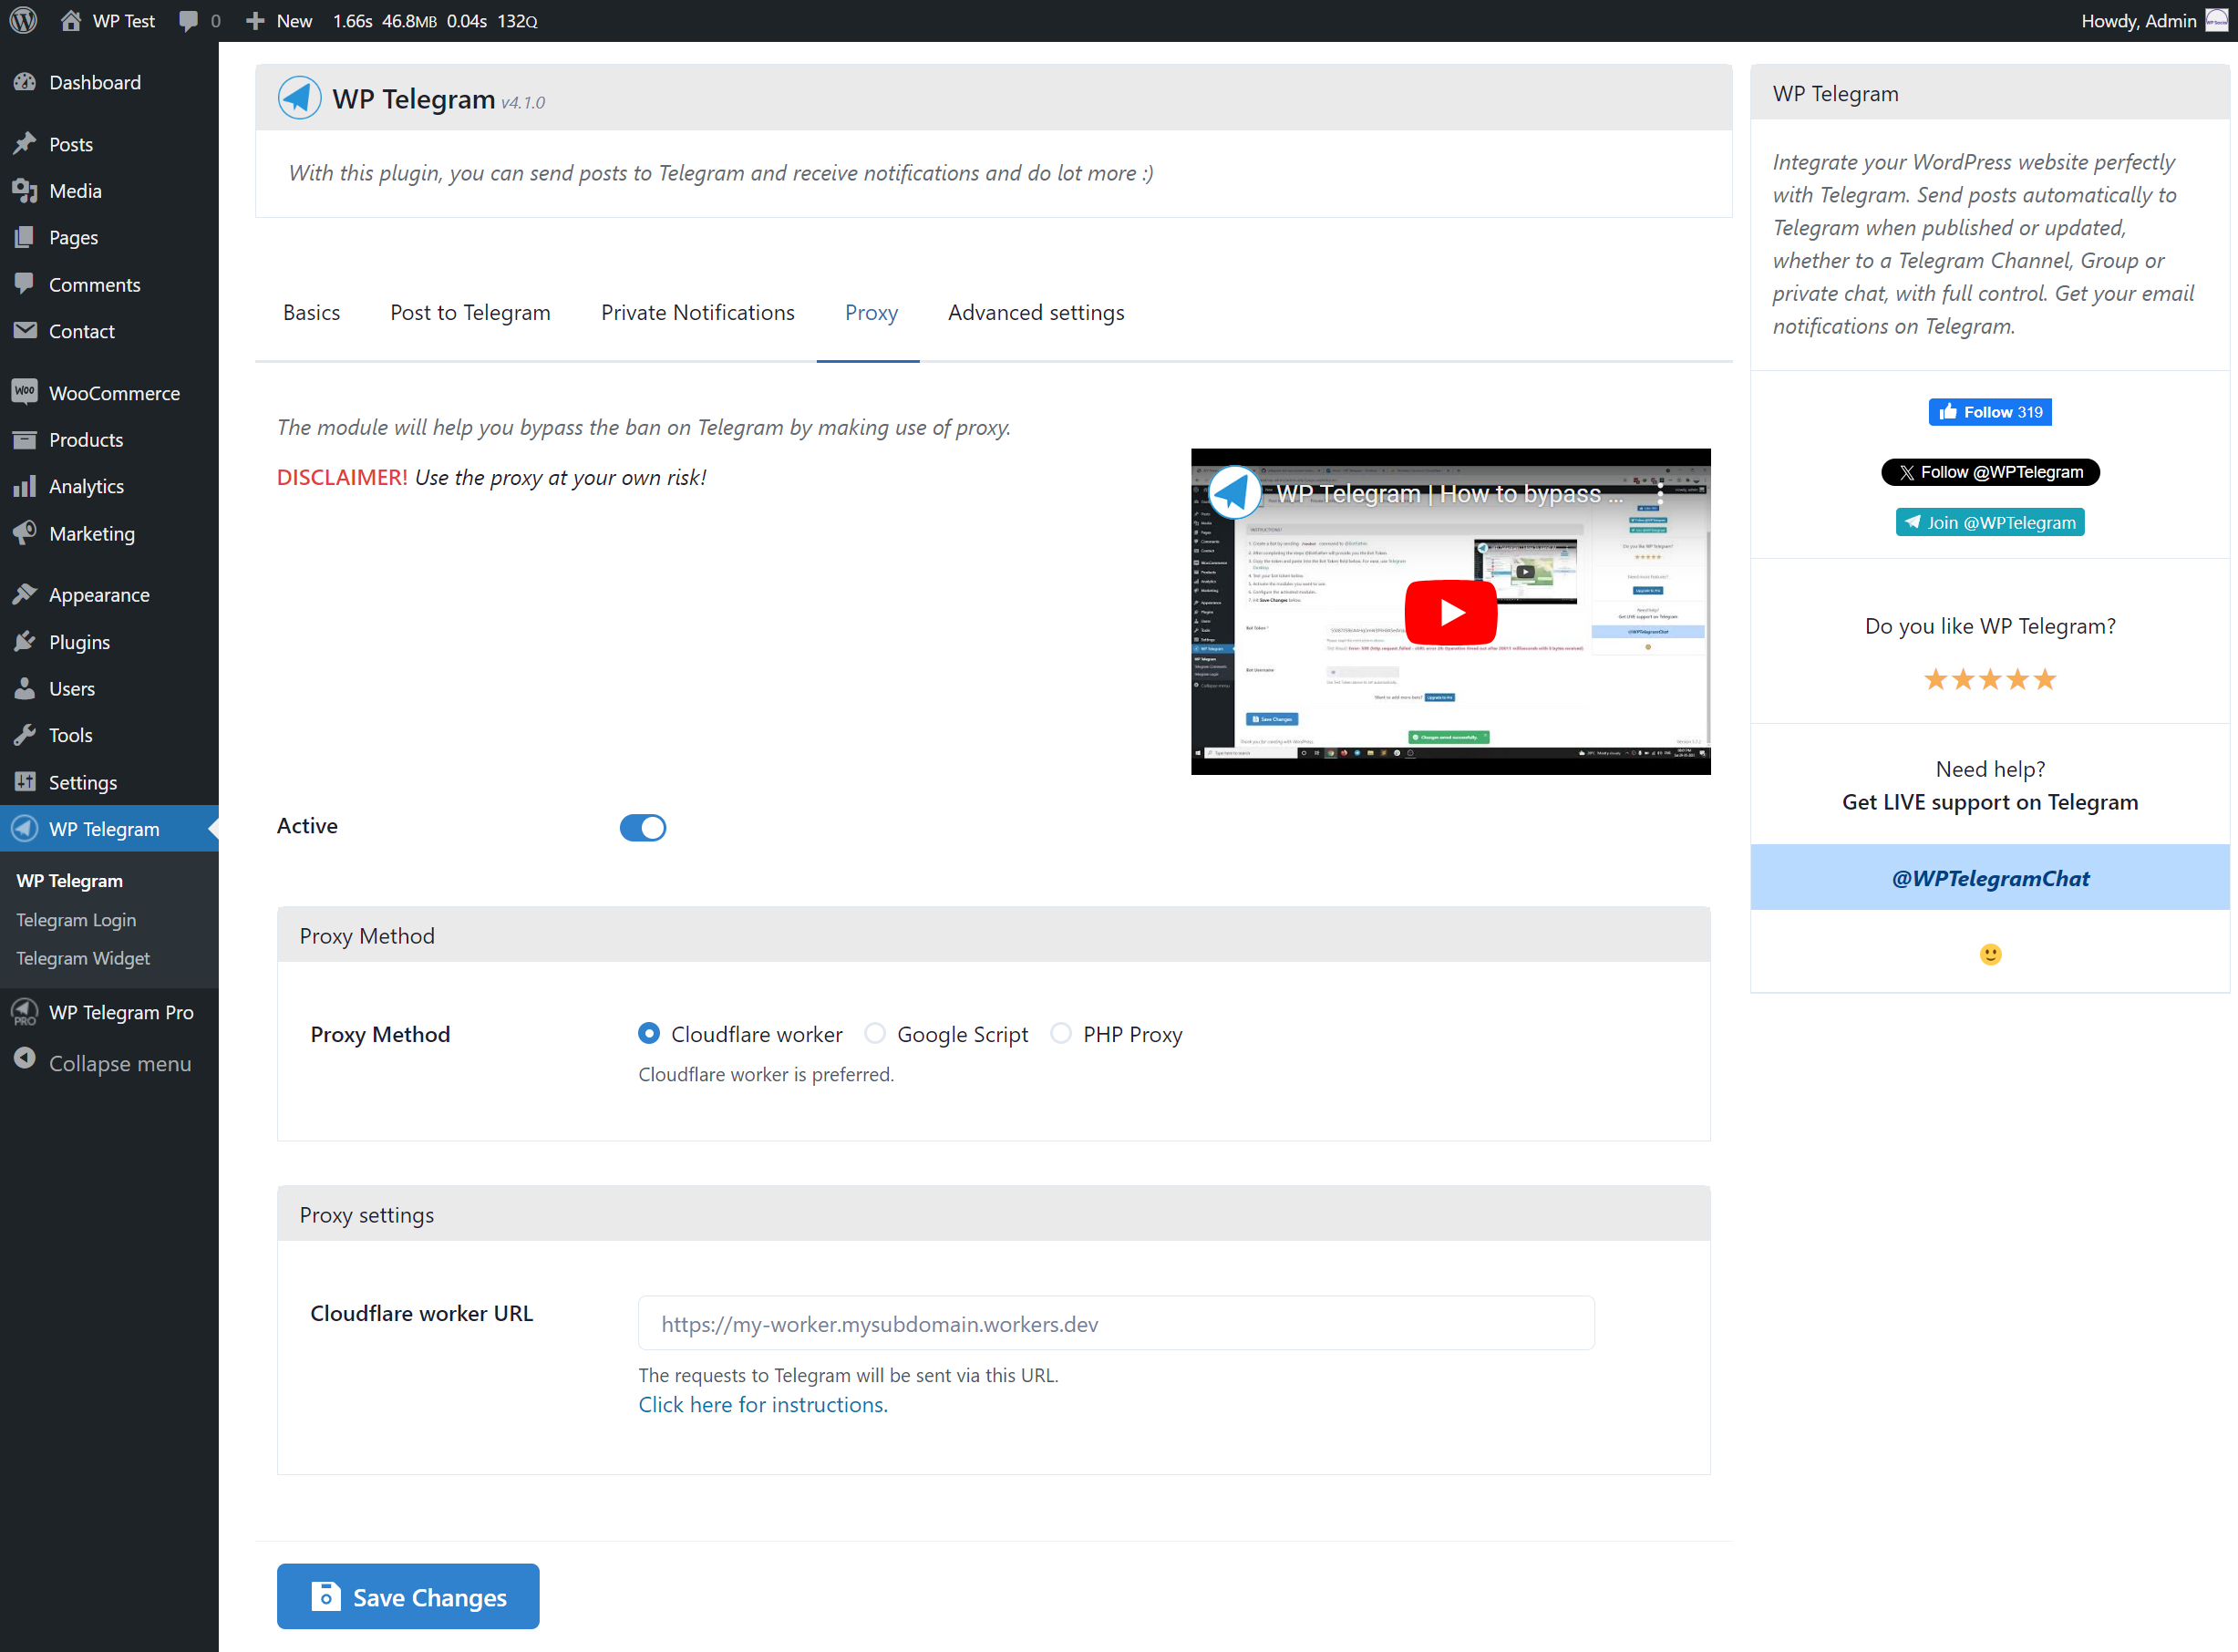
Proxy Settings
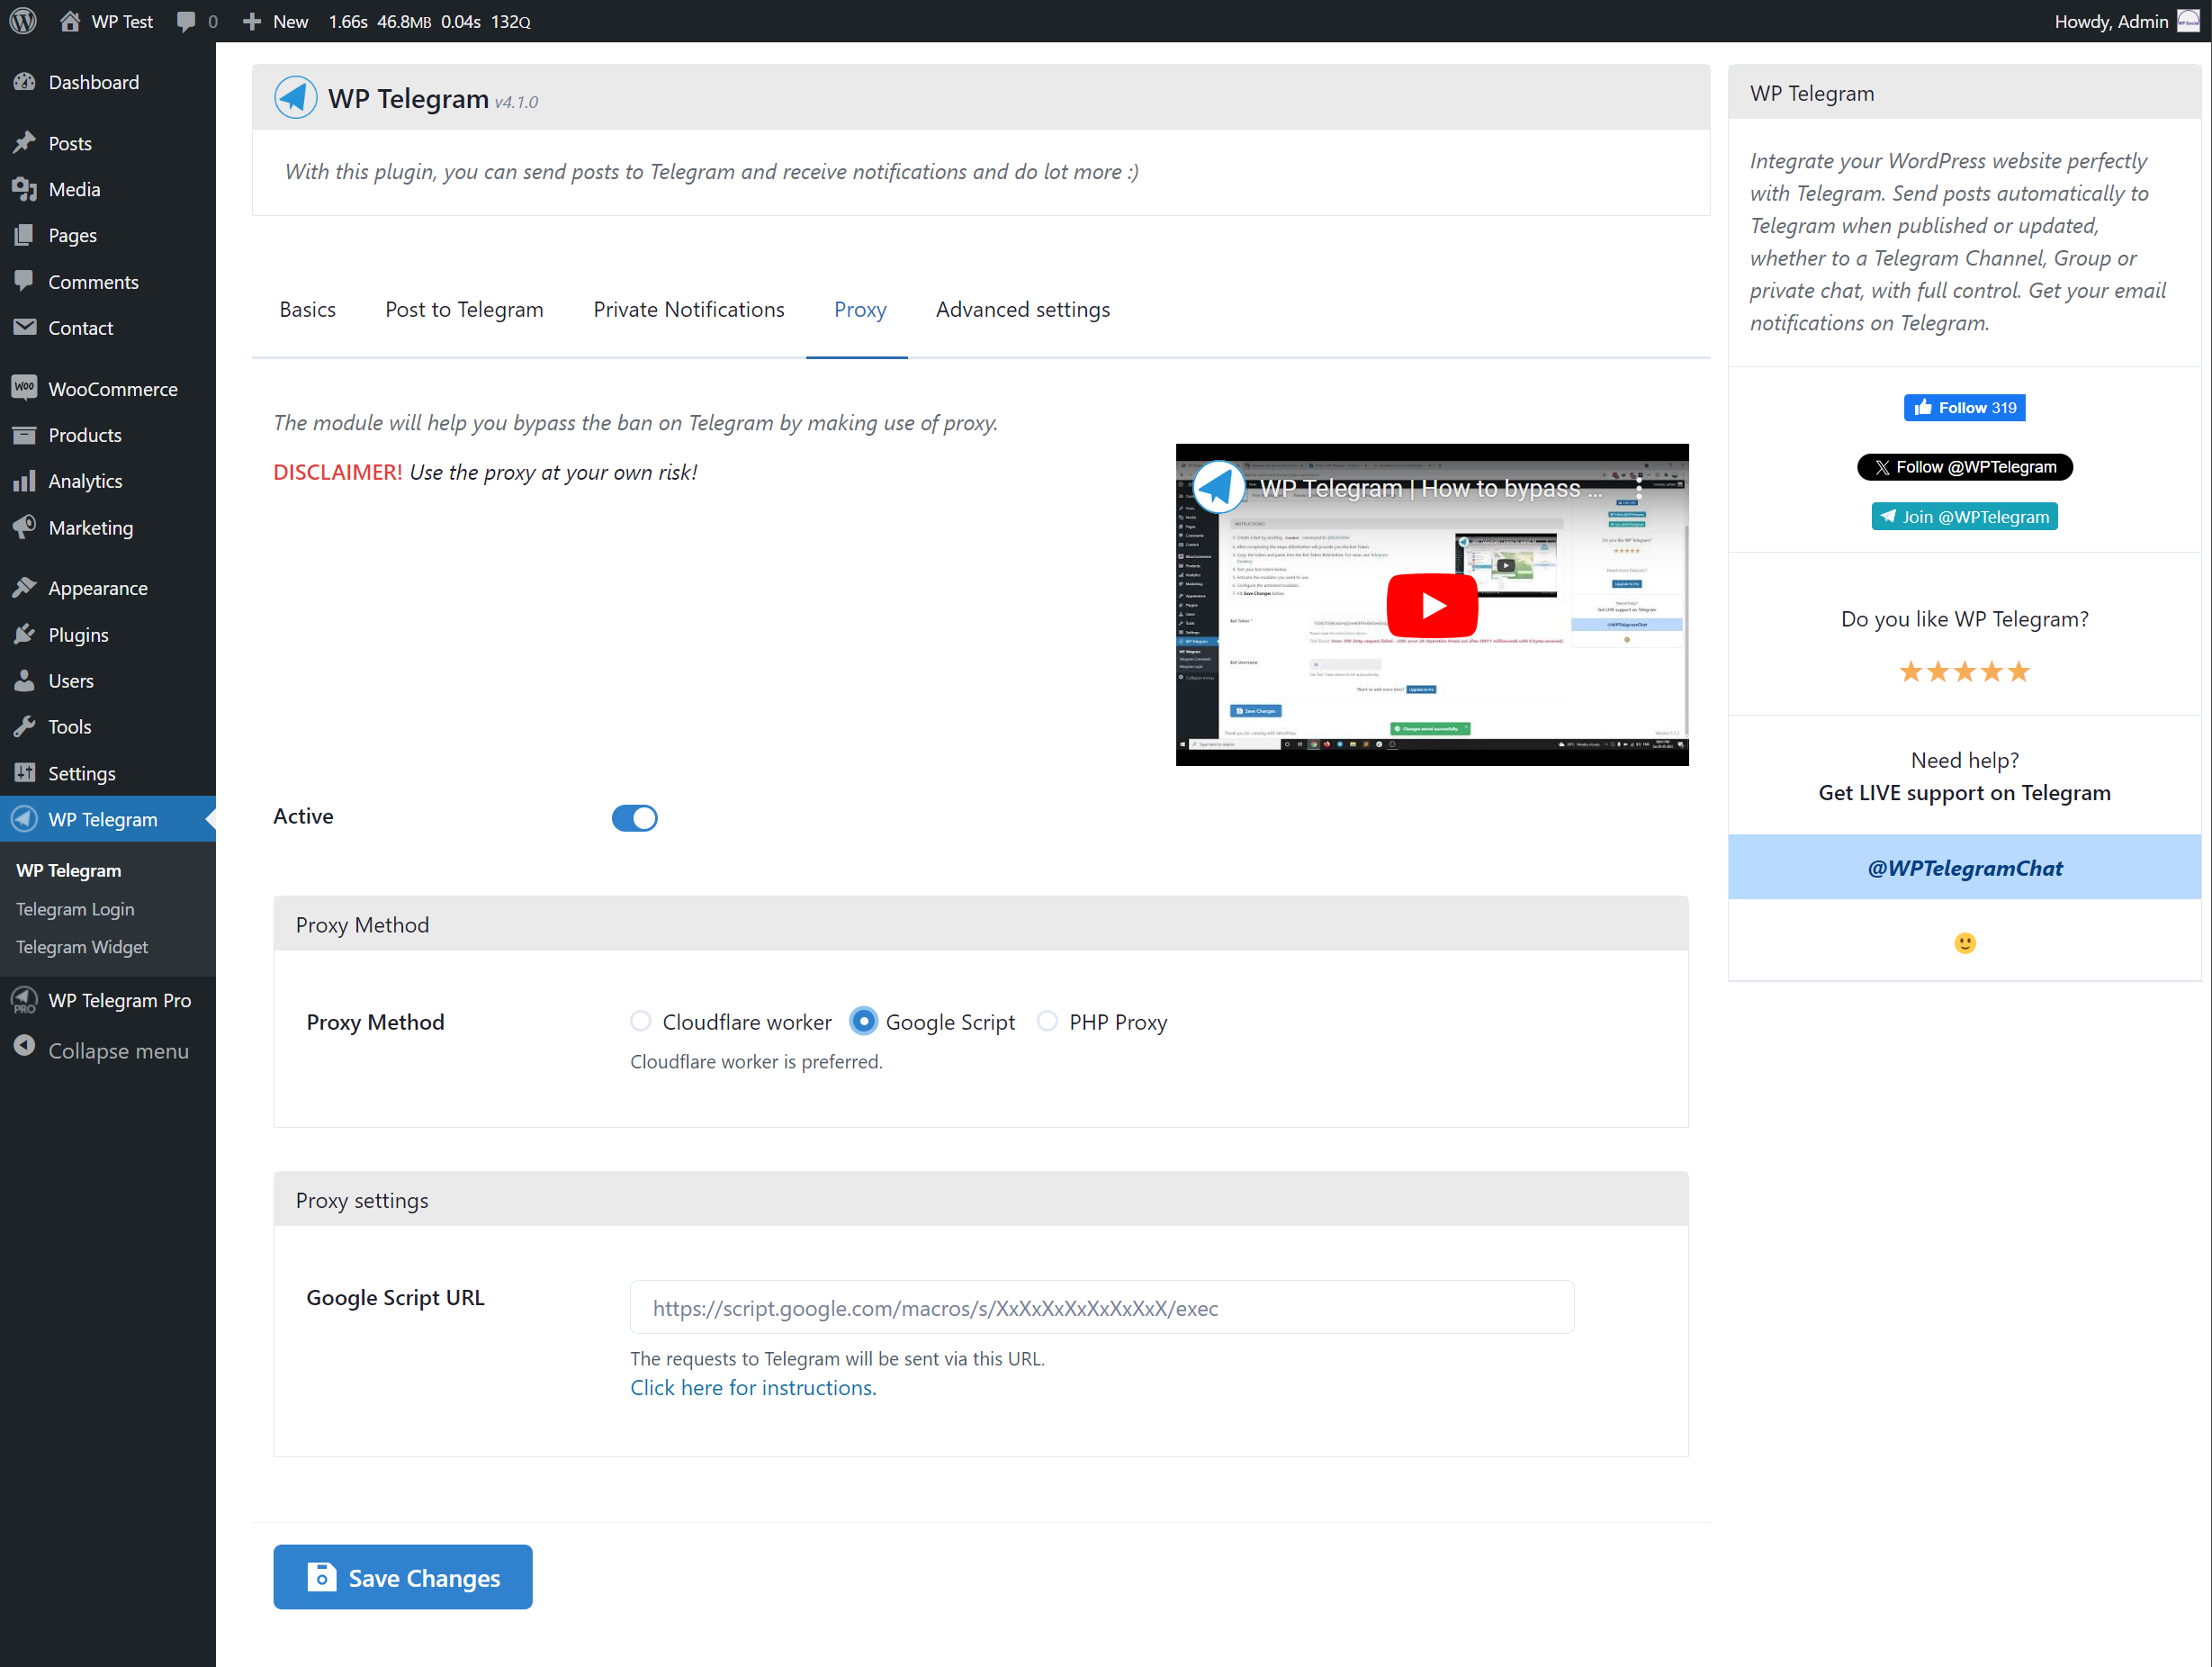
Proxy Settings (Cont...)

Proxy Settings (Cont...)
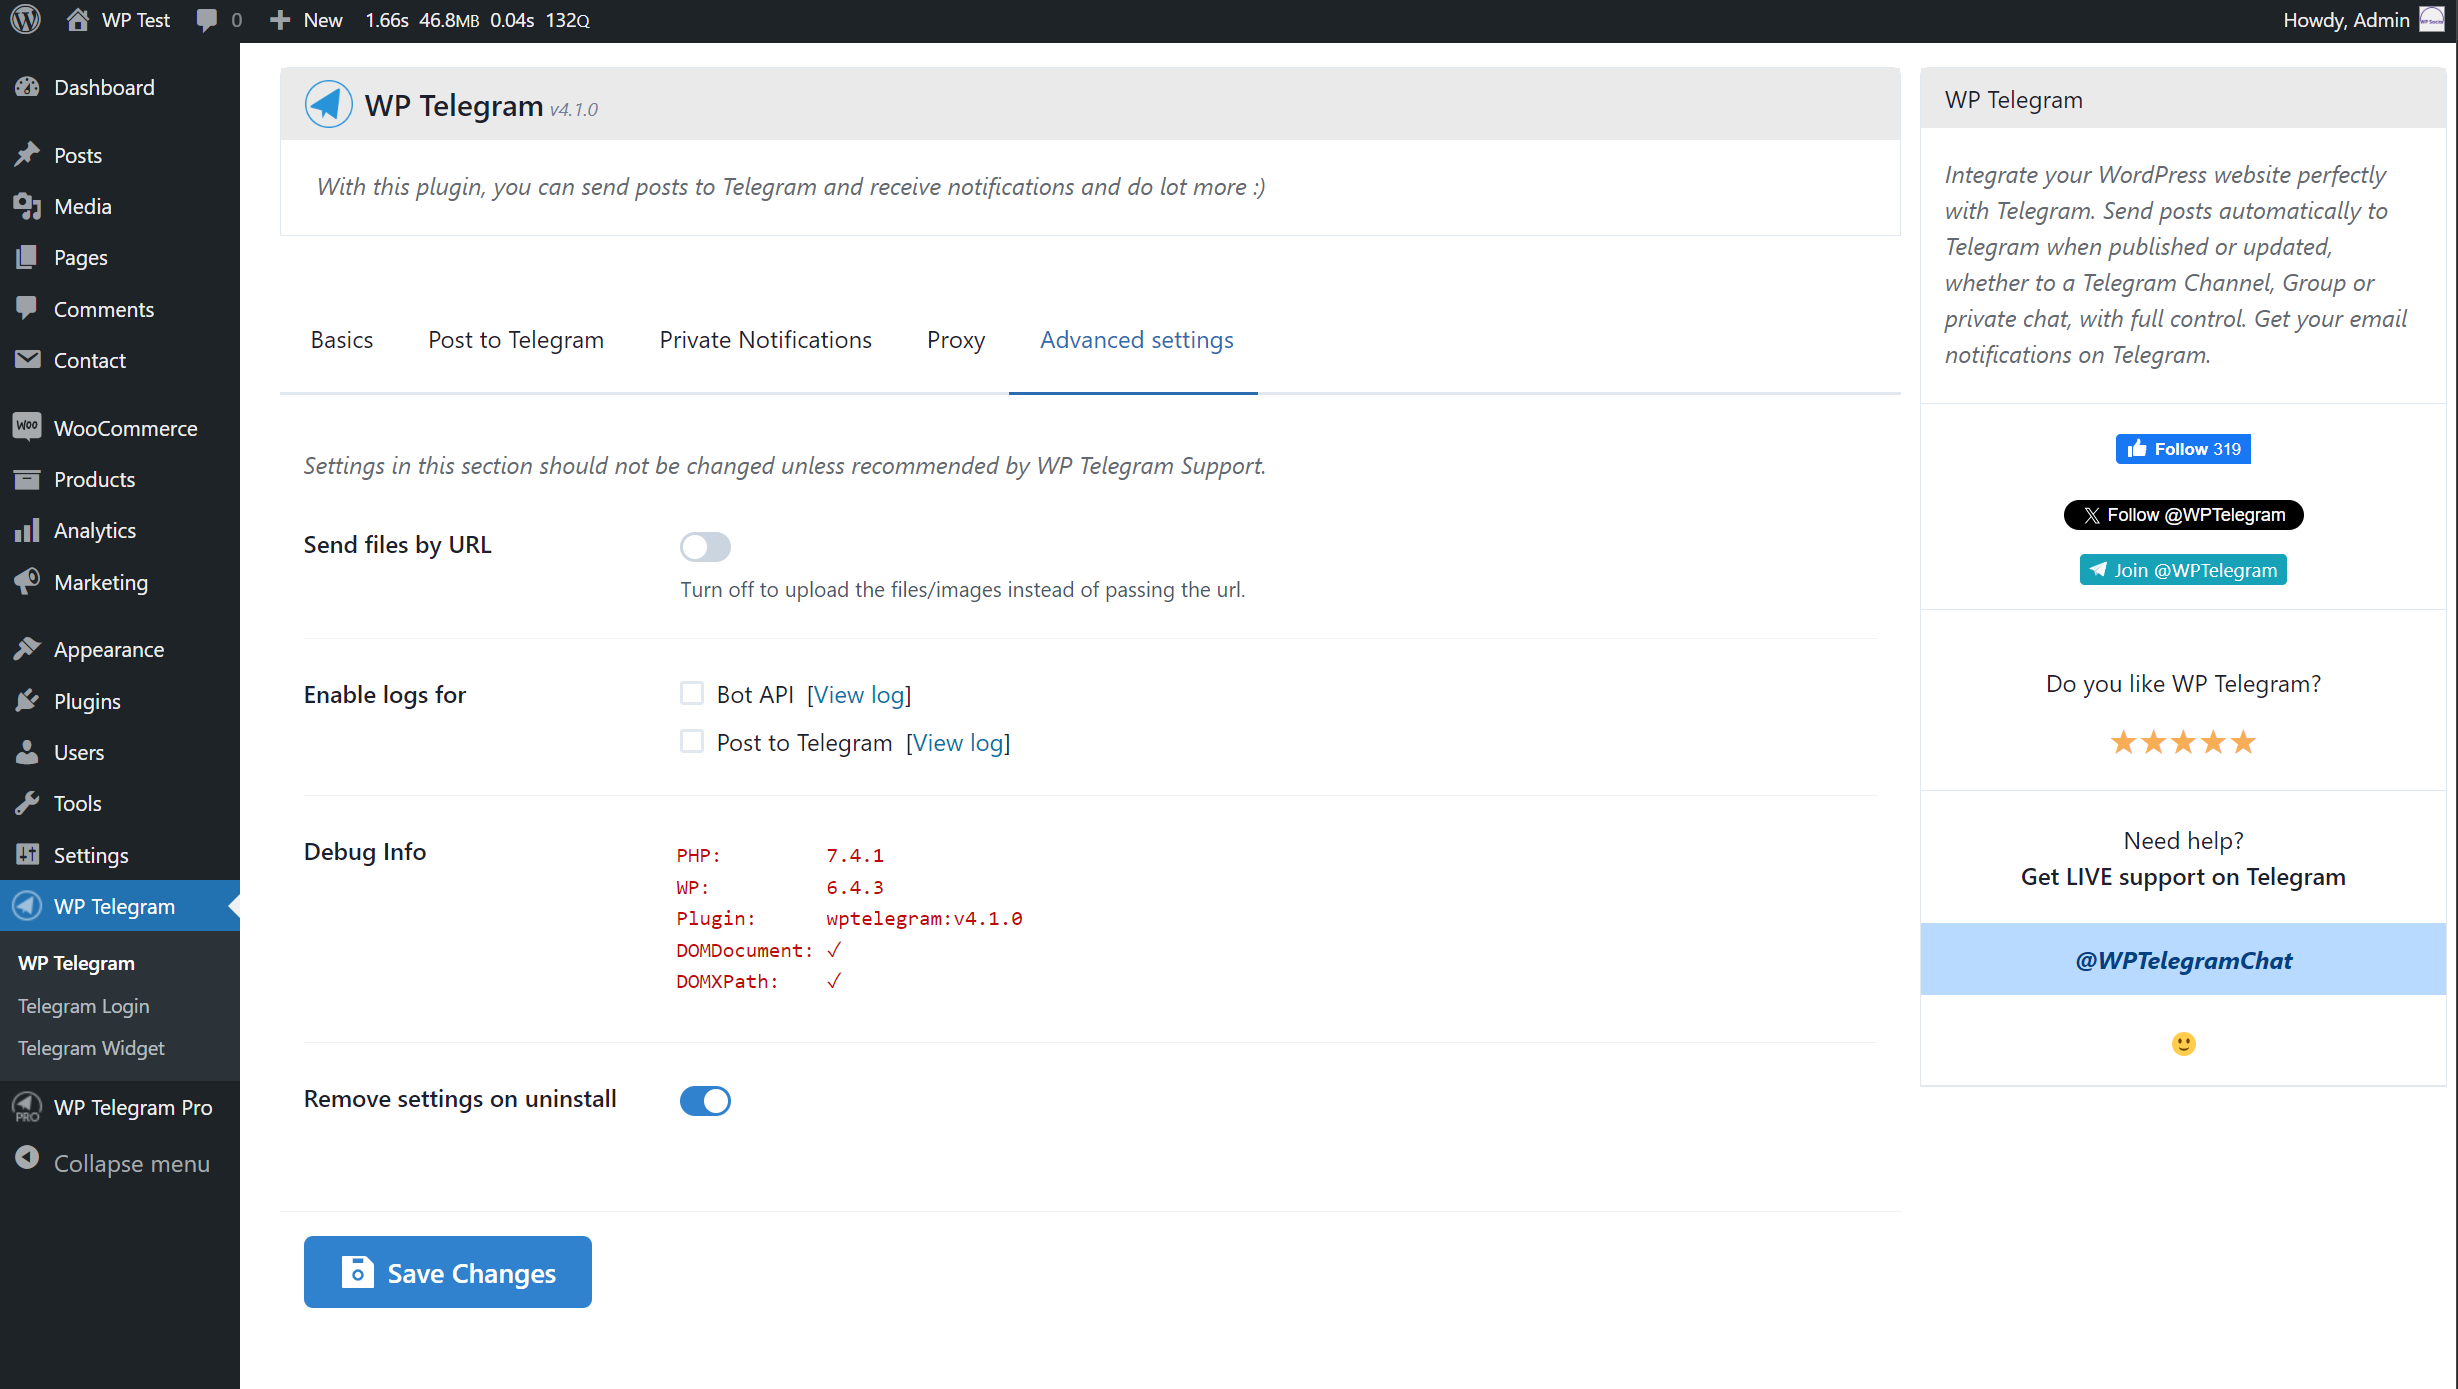
Advanced Settings

Post Edit Page (Classic Editor)
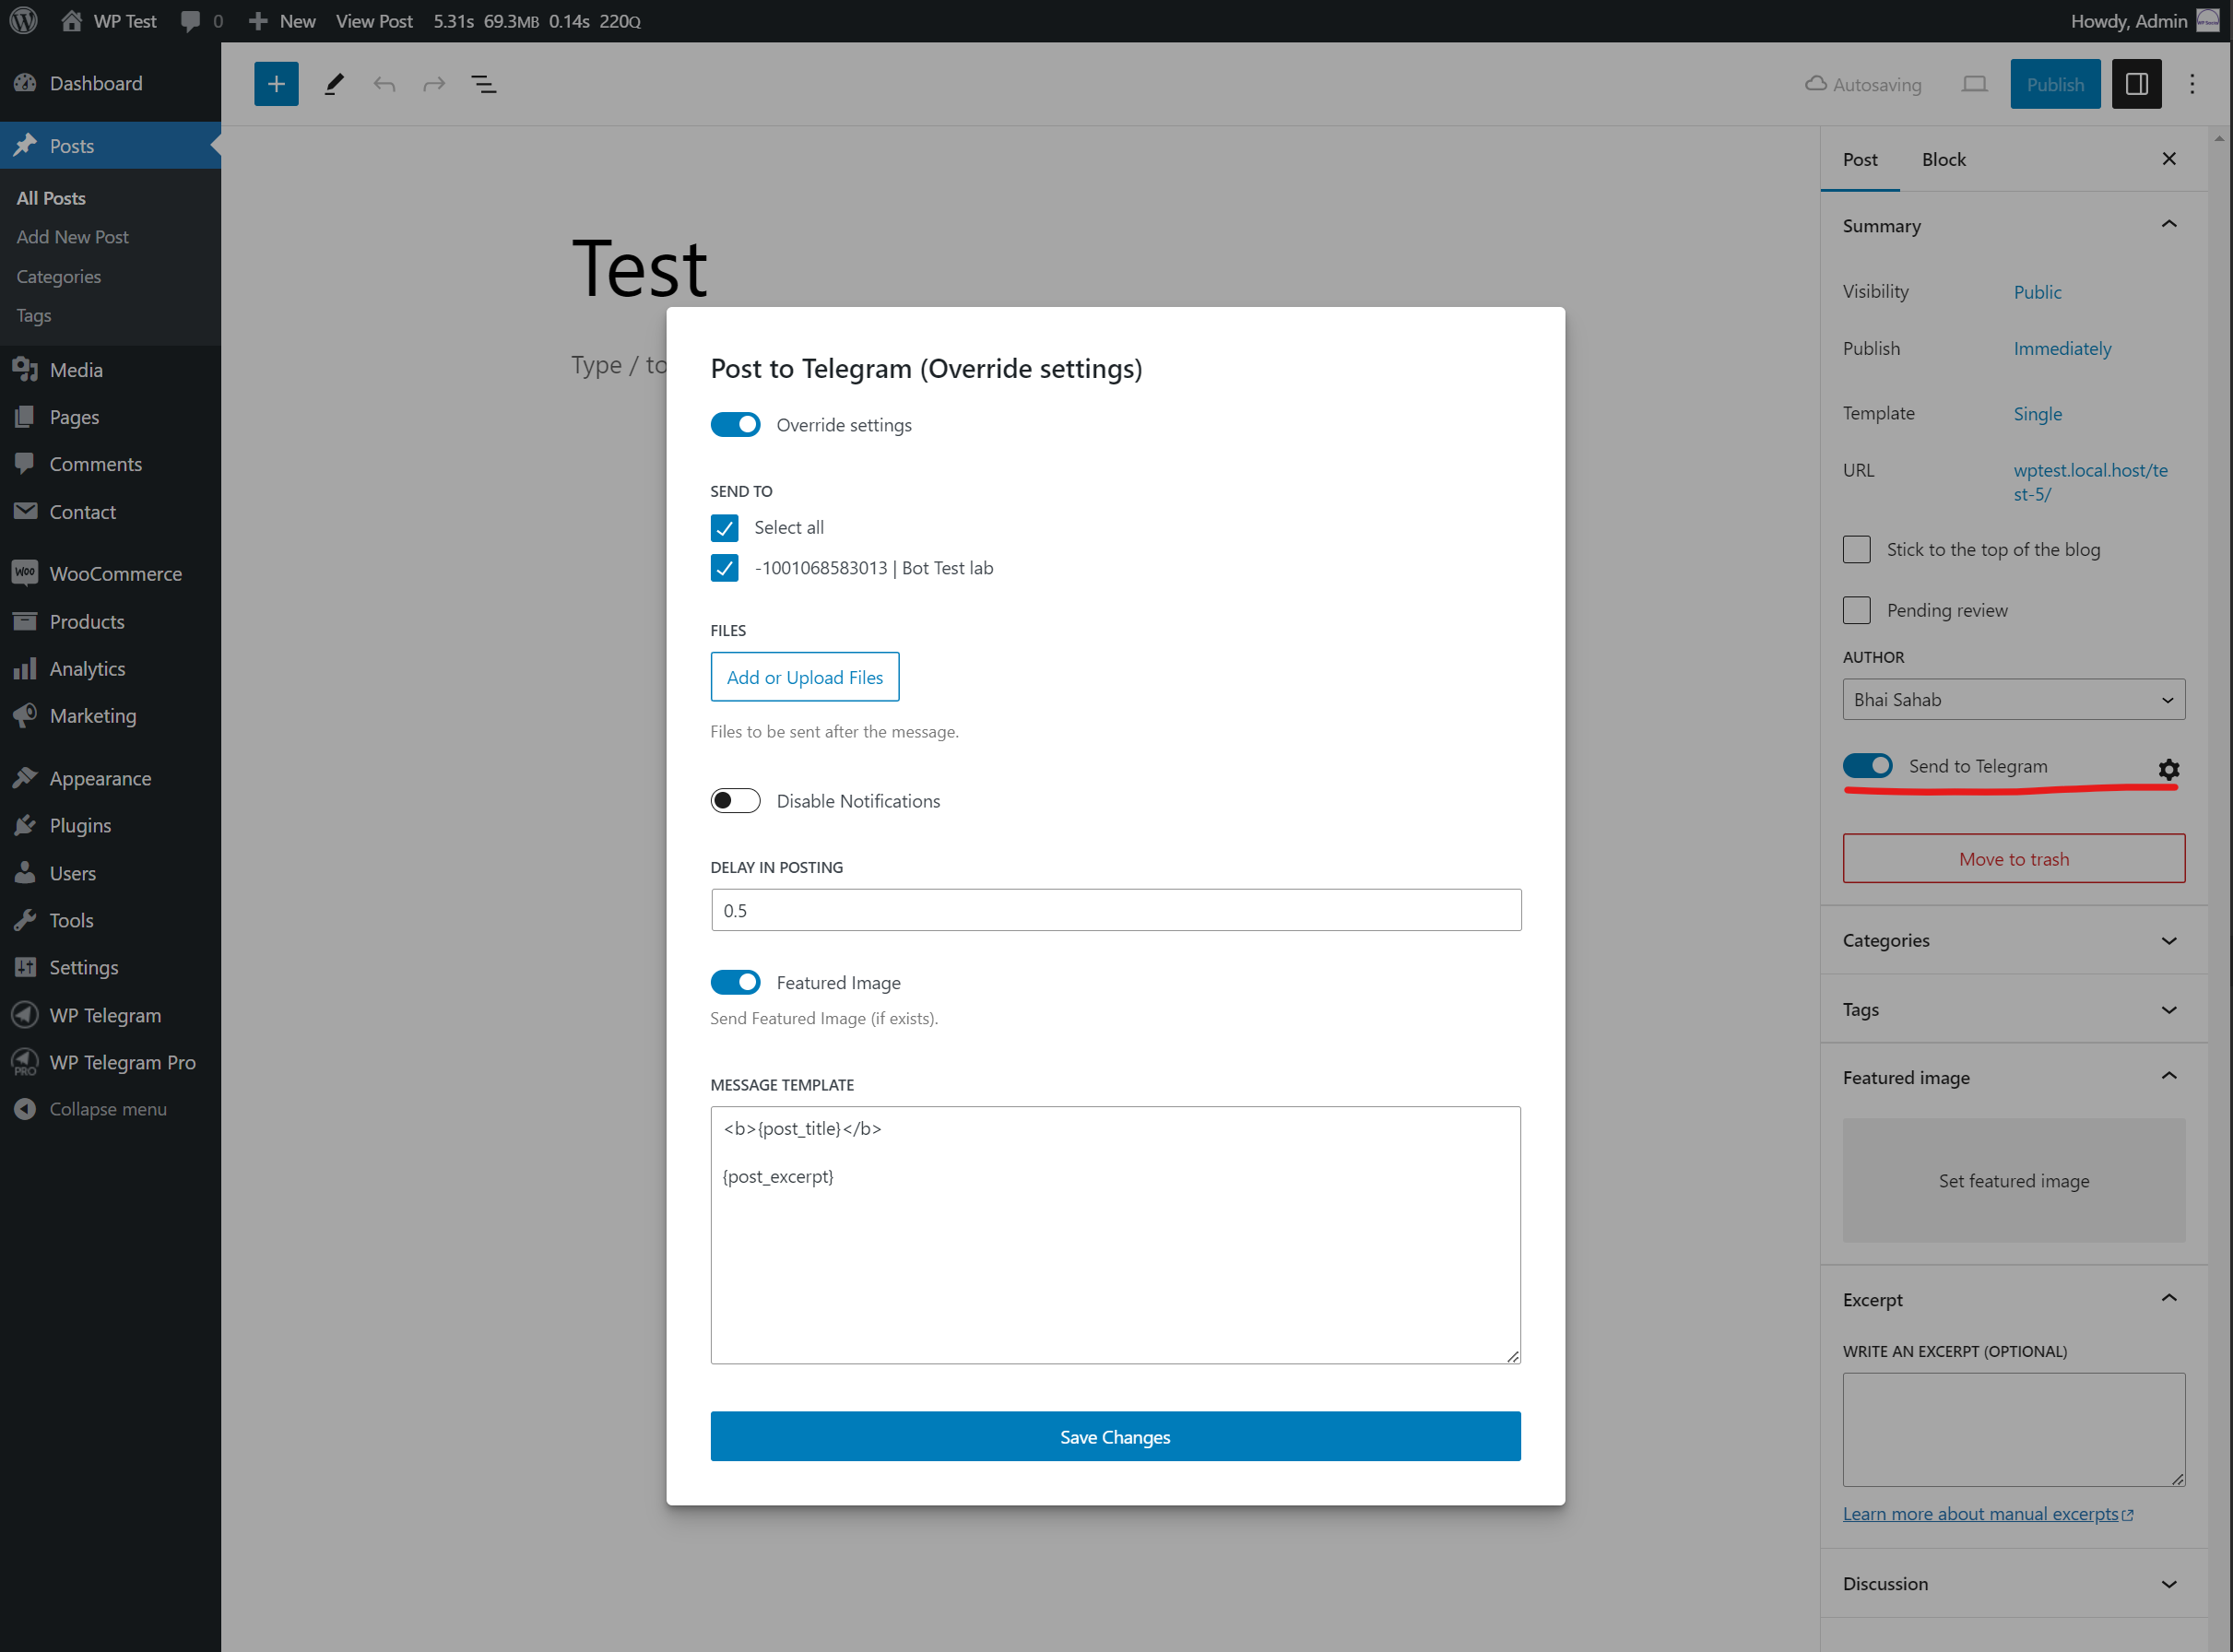
Post Edit Page (Block Editor)
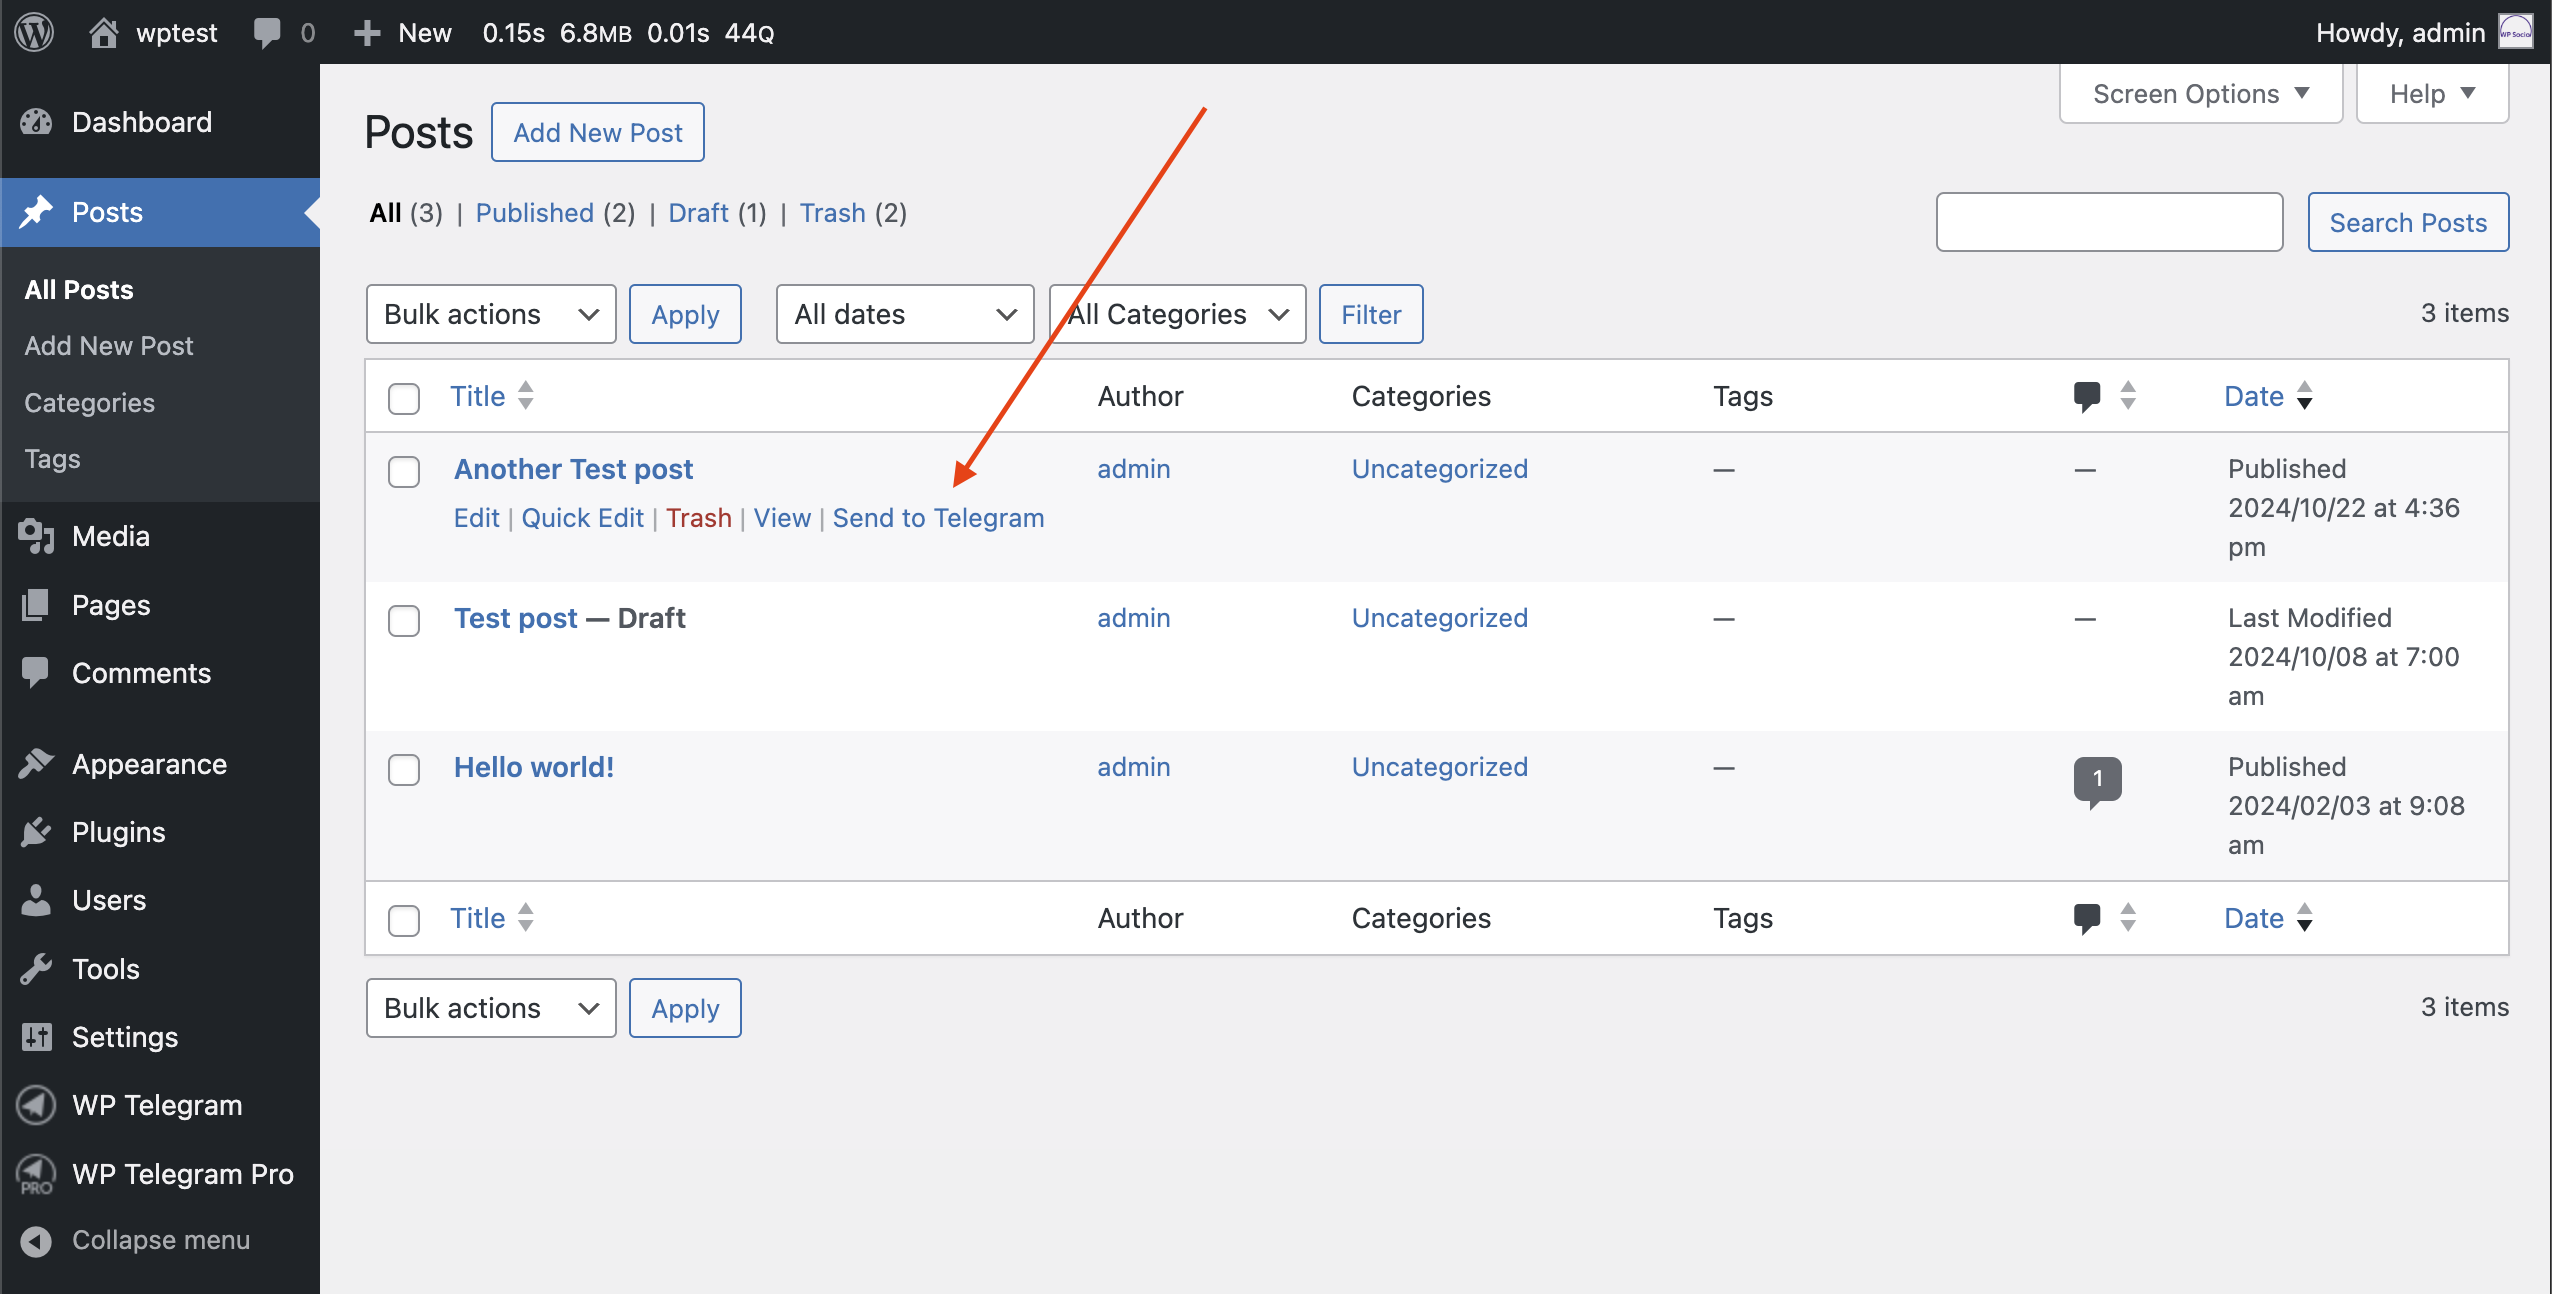
Instant Send to Telegram